I started doing heel elevated squats after struggling with squat depth for months. That small lift under my heels changed everything.
In this article, I'll cover what heel elevated squats are, how they work, their benefits and drawbacks, and how to do them right. I'll also flag the common mistakes most people make.
I've spent years testing different squat variations, so I know what works and what doesn't.
If your knees cave, your heels lift, or you just can't get low enough, this is for you.
Let's get into it.
What Are Heel Elevated Squats?
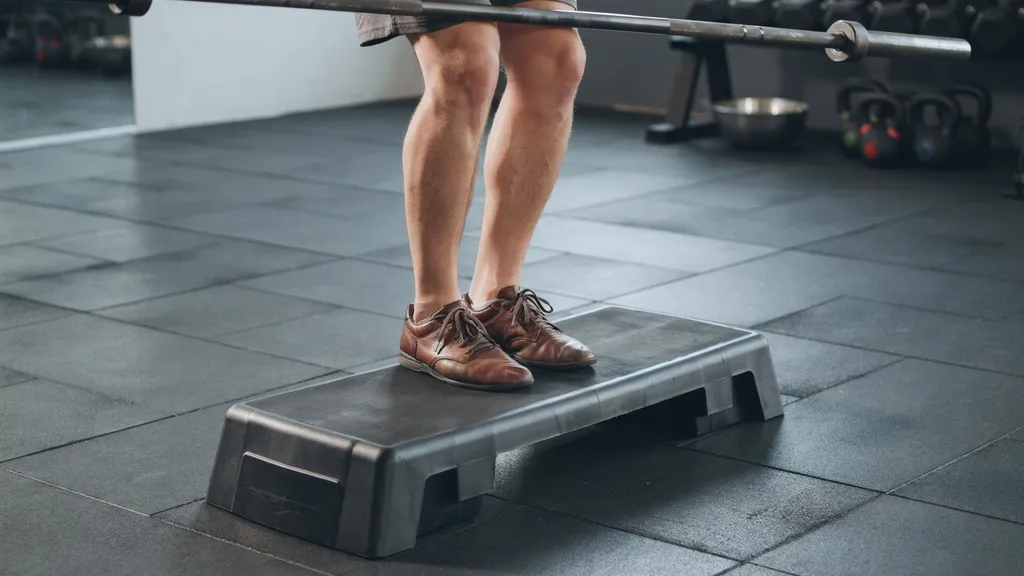
Heel elevated squats are exactly what the name says. You place something under your heels before you squat. A weight plate, a wedge, or even a folded mat will work.
Most people use a 1 to 2 inch lift. That small change shifts your whole body position before you even start moving.
The goal is to make squatting easier on your ankles and lower body. If your ankle mobility is limited, a heel lift helps you hit better depth without straining.
It's a simple fix. But it has a big impact.
How Heel Elevated Squats Change Squat Mechanics
When you raise your heels, your torso stays more upright. That means less forward lean. Less strain on your lower back.
Your knees track further over your toes. That increases quad activation. Your hips also drop lower with less effort.
Here's what actually shifts:
- Ankle range of motion is less of a limiting factor
- Quad muscles work harder throughout the movement
- Your torso angle becomes more vertical
- You reach greater depth with less mobility
For people with tight calves or stiff ankles, this variation makes squatting feel natural. It removes a mechanical block and lets you focus on form.
Benefits of Heel Elevated Squats
I've seen real results from adding this squat variation.
Here's what stood out to me:
- Better squat depth. The heel lift lets your hips sink lower. If you've always struggled to hit parallel, this helps right away.
- More quad work. Your quads take on more load in this position. If you want stronger, bigger quads, this squat targets them directly.
- Less lower back strain. A more upright torso means your spine isn't under as much pressure. That's a win if you have back tightness.
- Good for beginners. If you're learning to squat, this variation gives you better body awareness. You learn the movement faster.
- Useful for rehab. Physical therapists often use heel-elevated squats during knee recovery. The controlled range of motion helps rebuild strength.
- Works as a training tool. Even experienced lifters use this to overload the quads or practice depth. It's not just a beginner's move.
Potential Drawbacks of Heel Elevated Squats
This variation isn't perfect for everyone.
Here's what to watch out for:
- It can mask ankle problems. If you always squat with a heel lift, your ankle mobility may never improve. The lift becomes a crutch.
- Not sport-specific for everyone. Athletes who need flat-foot strength, like powerlifters or sprinters, may not benefit long-term.
- Risk of dependency. You might find it hard to squat flat-footed after relying on heel elevation for too long.
- Balance issues. Some people feel unstable with a lift, especially on a round plate. Start with a wedge for a flat surface.
- Not a fix for bad form. If your knees cave or your chest drops, the heel lift won't solve those issues. Fix form first.
How to Perform Heel Elevated Squats Correctly

Here's how I do them and what I recommend.
What you need: A weight plate (25 lb works well), a squat wedge, or a firm surface to raise your heels about 1 to 2 inches.
Step 1:Set up your heel lift Place both heels on the surface. Your toes stay on the floor. Feet should be shoulder-width apart, toes slightly out.
Step 2:Brace your core Take a breath in. Tighten your core before you move. This protects your spine.
Step 3: Start the squat Push your knees out in line with your toes. Sit your hips straight down, not back. Keep your chest up.
Step 4:Hit depth Go as low as you can with control. Aim for thighs parallel to the floor or lower if mobility allows.
Step 5:Drive up Push through your full foot. Keep your knees tracking out. Stand tall at the top.
Go slow at first. Control matters more than weight.
Common Mistakes When Performing Heel Elevated Squats
Even with a heel lift, people still get this wrong.
Here are the mistakes I see most often:
- Letting the knees collapse inward during the descent
- Using too high a lift, which puts too much stress on the knees
- Forgetting to brace the core before squatting
- Rushing the movement and losing control at the bottom
- Placing heels on a round plate, which creates instability
- Not keeping the chest up throughout the rep
- Using the heel lift as a permanent solution instead of working on ankle mobility alongside it
Fix these one at a time. Film yourself if you can. Small corrections make a big difference.
Conclusion
Heel elevated squats are a solid option if you want more quad work or better depth. I found them useful when my ankle mobility was holding me back.
They helped me feel the squat correctly for the first time.
That said, don't rely on them forever. Work on your ankle mobility in parallel. Use the heel lift as a stepping stone, not a permanent fix.
If you're a beginner or coming back from injury, this variation is worth trying. Start light, focus on form, and see how your body responds. Some people feel it immediately.
Others need a few sessions to adjust.
Have you tried heel elevated squats before? What difference did it make for you?
Frequently Asked Questions
Are heel elevated squats bad for your knees?
They are generally safe when done with proper form. Using too high a lift or letting knees cave can increase stress, so keep the elevation moderate.
How high should my heel elevation be?
A 1 to 2 inch lift is enough for most people. Going higher shifts too much load onto the knees and reduces stability.
Can heel elevated squats replace regular squats?
They work well as a variation but should not fully replace flat-footed squats. Both serve different purposes in a well-rounded leg routine.
Do heel elevated squats build more muscle than regular squats?
They target the quads more directly, which can lead to greater quad development. For overall leg strength, combining both variations works best.
Should beginners use heel elevated squats?
Yes, they are beginner-friendly. The lift makes it easier to learn squat depth and body positioning before moving to flat-footed squats.