The dead bug exercise looks simple. But most people do it wrong.
In this article, I'll walk you through everything you need to know about dead bug exercise form, from setup to breathing to common mistakes.
I've worked with beginners and trained alongside people recovering from back pain, and this move comes up again and again for good reason.
You'll learn the correct technique, which muscles it targets, how to modify it, and how to add it to your routine.
If you want a stronger core and a healthier back, this guide is for you.
What Is the Dead Bug Exercise?
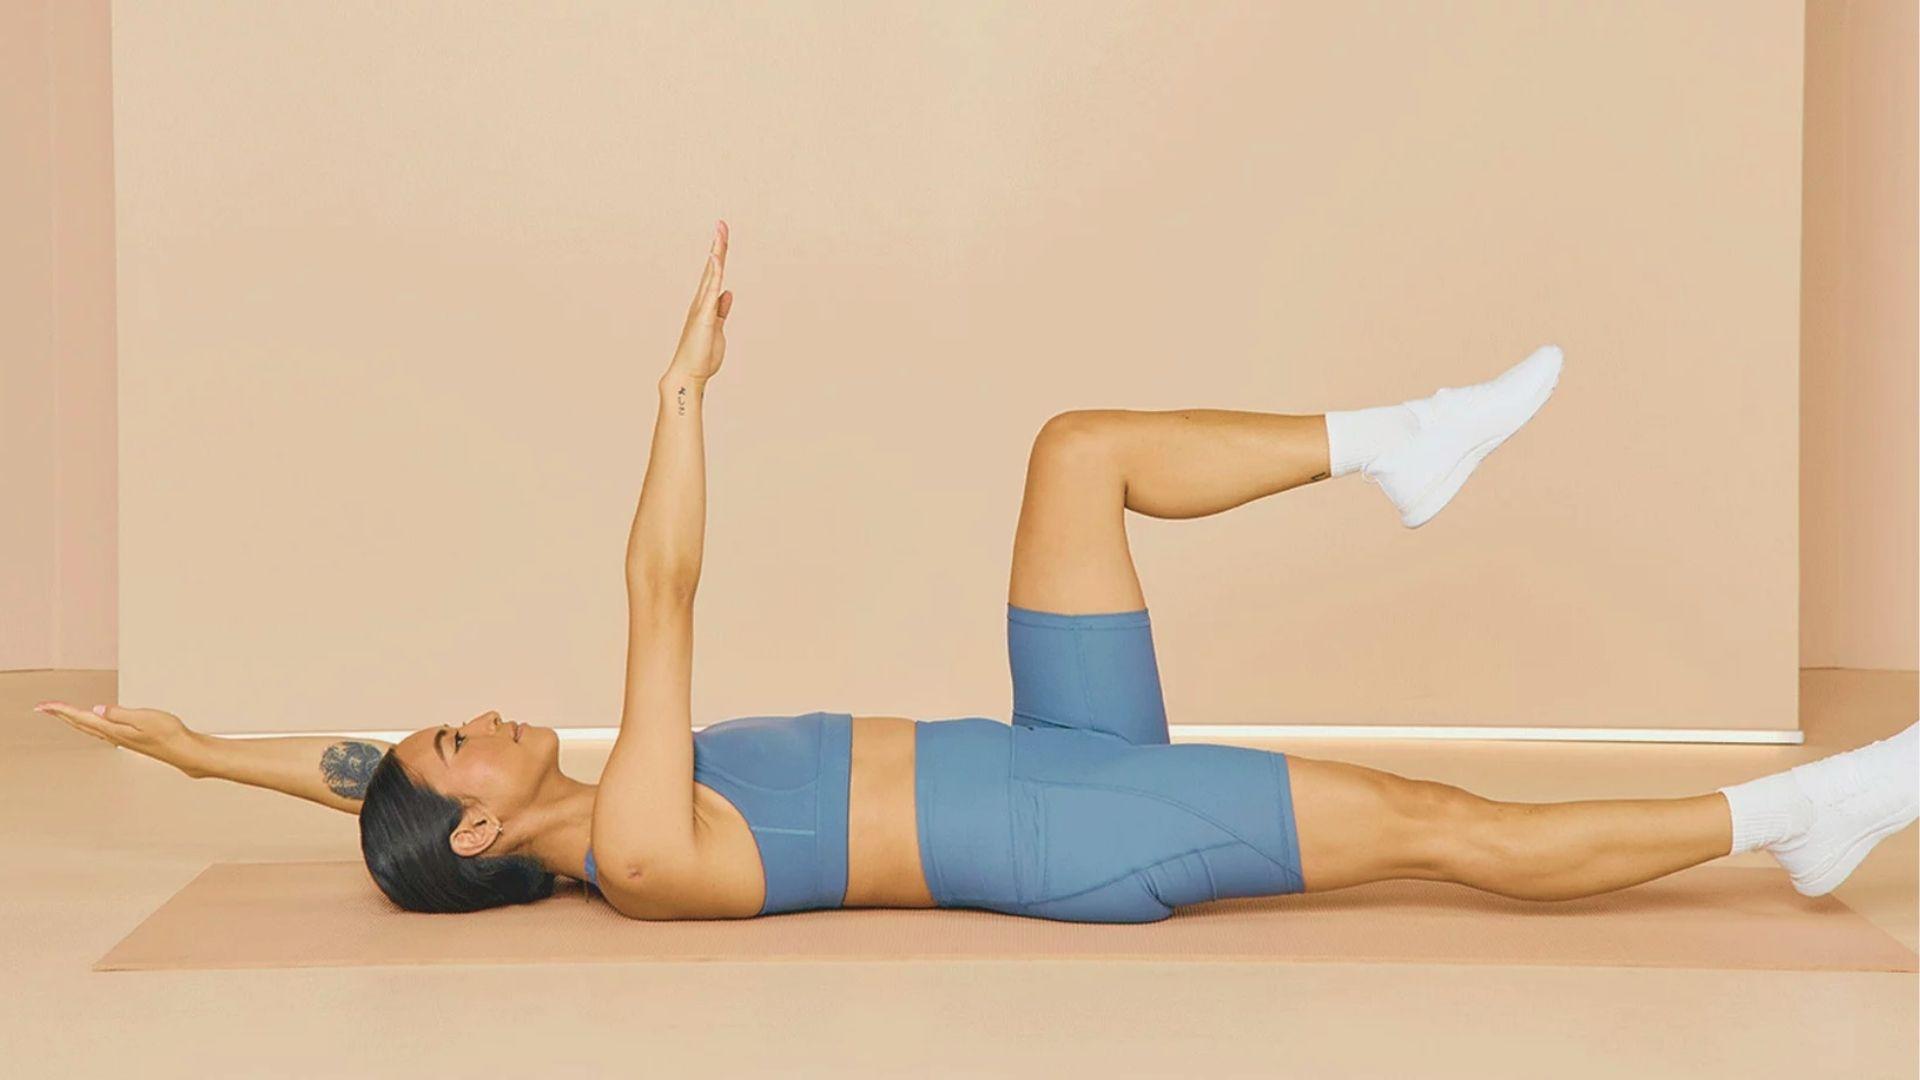
The dead bug exercise is a floor-based core movement that trains stability, not just strength. You lie on your back, arms pointing up, knees bent at 90 degrees. Then you slowly extend one arm and the opposite leg while keeping your lower back flat on the floor. It looks simple. It is not.
Almost anyone can benefit from it, including beginners, people with lower back pain, athletes, and older adults.
Physical therapists recommend it often because it is low-impact, safe for the spine, and builds the deep core muscles that support your posture and protect your back.
Benefits of Proper Dead Bug Exercise Form

Done right, this exercise offers far more than just a strong core. Here is a look at what good form can do for your body.
Builds Core Stability
The dead bug targets your deep core muscles, not just the ones on the surface. These muscles act like a natural brace for your spine. When they get stronger, everything from lifting to sitting gets easier.
Supports Lower Back Health
By keeping your lower back flat during the movement, you train your body to protect that area. Over time, this reduces stress on the lumbar spine and may lower the risk of back pain.
Improves Coordination and Body Control
Moving opposite limbs at the same time challenges your nervous system. This builds better coordination, which helps with sports, daily movement, and balance.
Improves Posture and Movement Efficiency
A strong core holds your body upright without effort. As your core gets better at staying stable, your posture improves naturally. You'll move more efficiently too, with less wasted energy in every step or lift.
Muscles Worked During the Dead Bug Exercise
This exercise works more muscles than most people expect. Here is a breakdown.
Transverse Abdominis
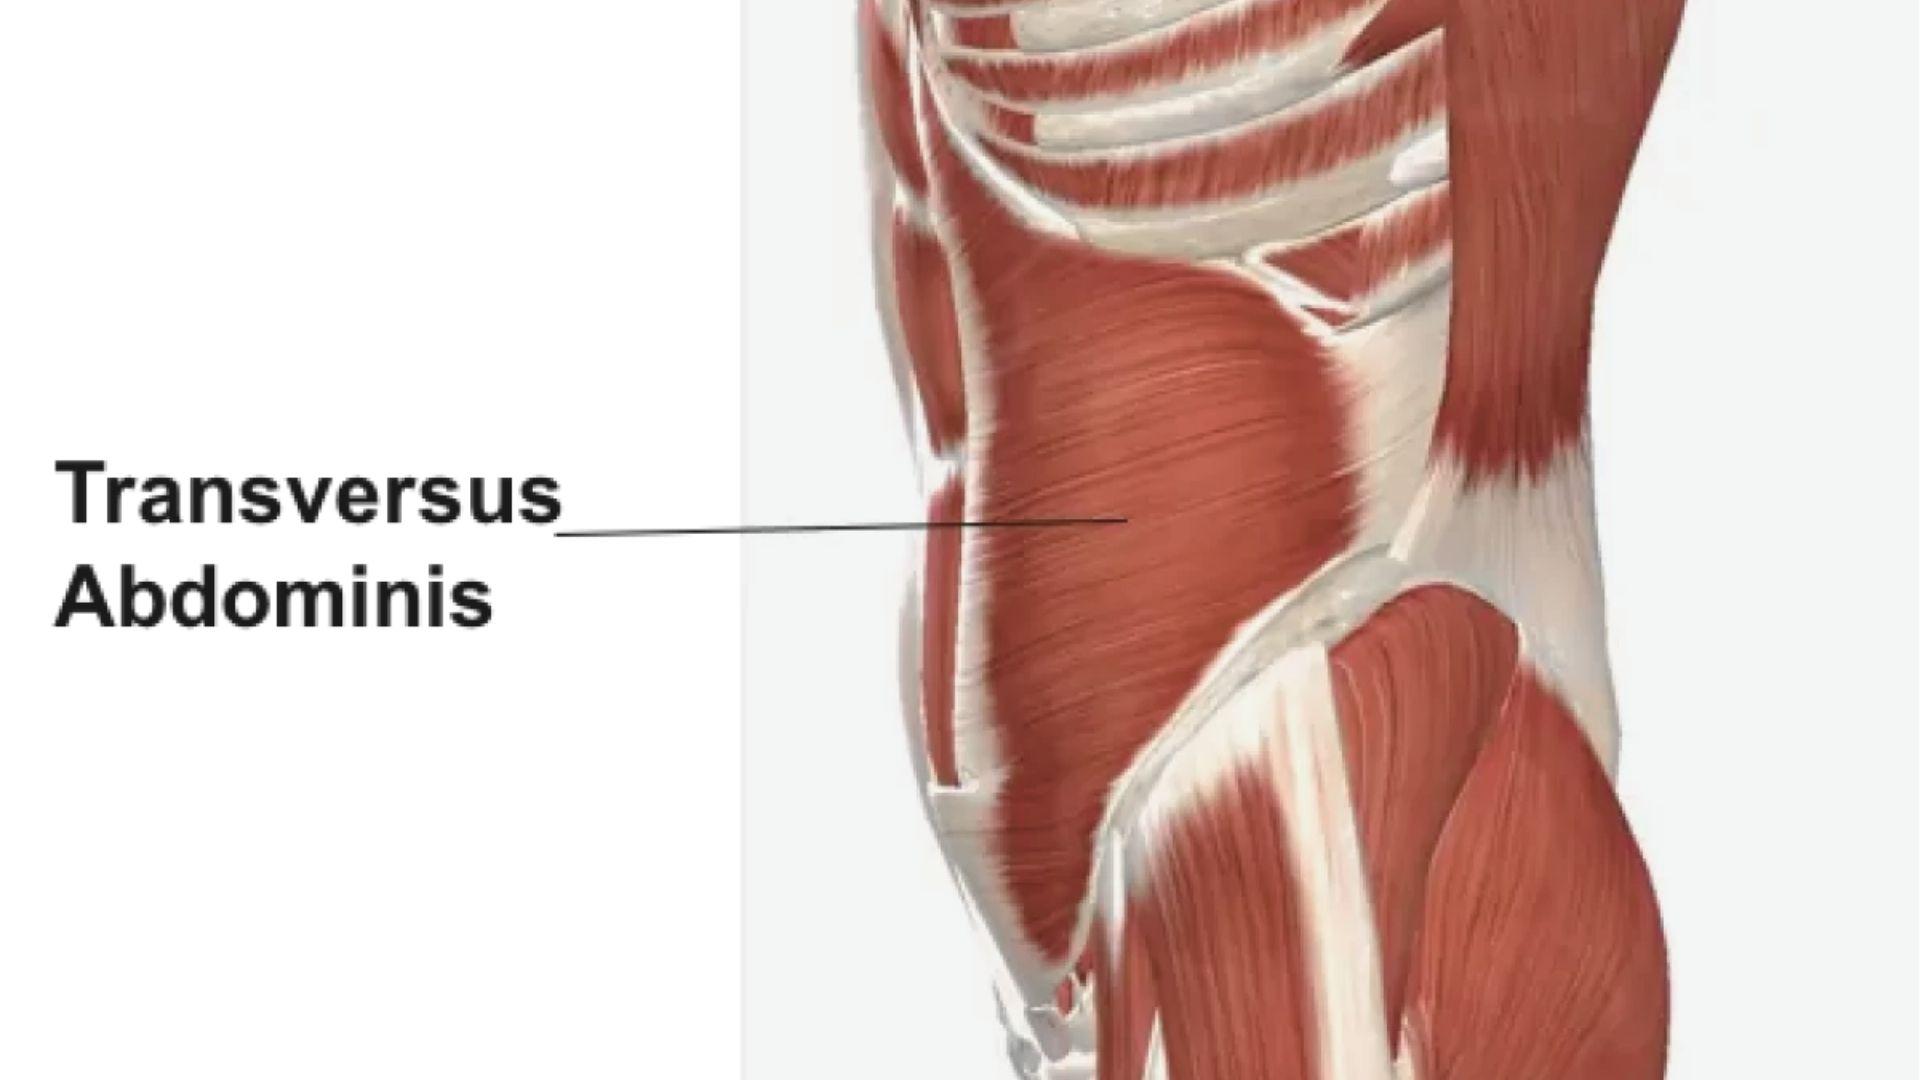
This is the deepest layer of your abdominal muscles. It wraps around your midsection like a belt. The dead bug activates this muscle more effectively than many surface-level exercises do.
Rectus Abdominis and Obliques
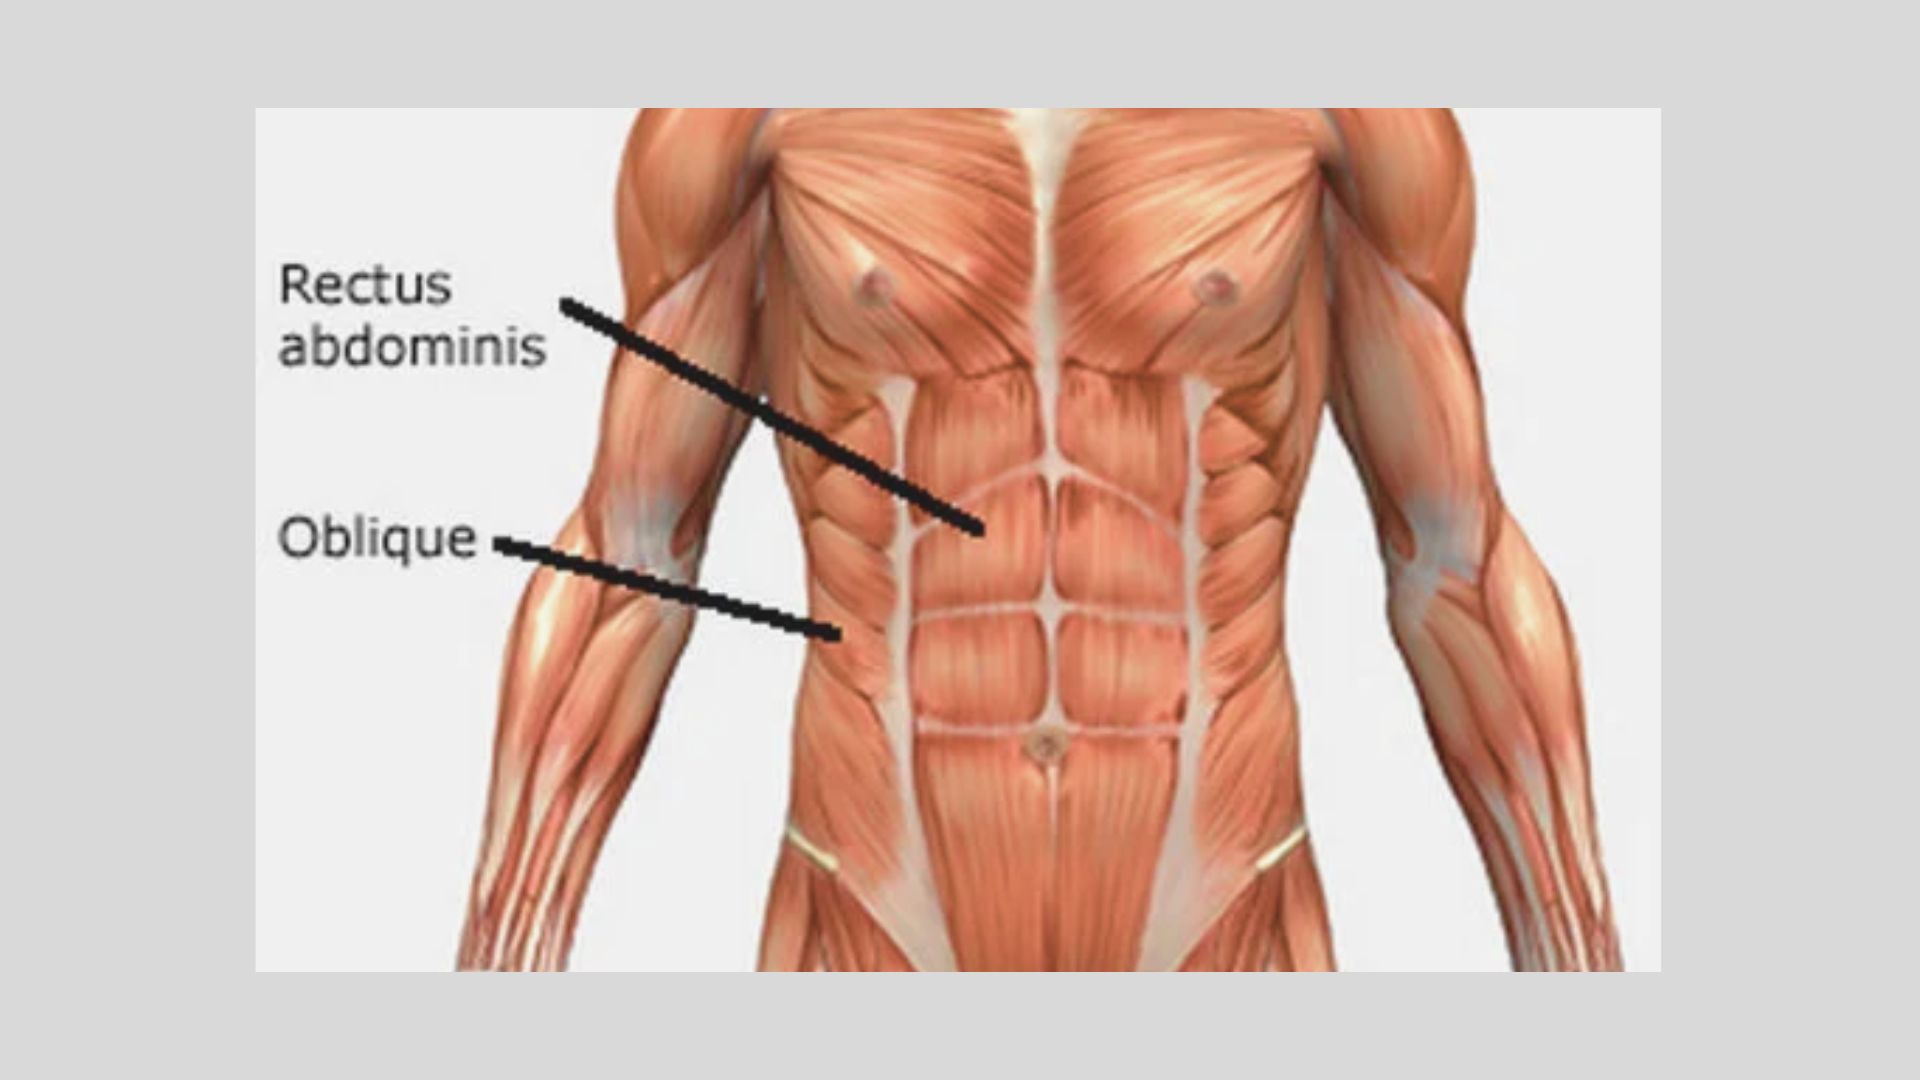
Your rectus abdominis runs down the front of your stomach. Your obliques are on the sides. Both help stabilize your torso while your arms and legs move away from your body.
Hip Stabilizers and Spinal Muscles
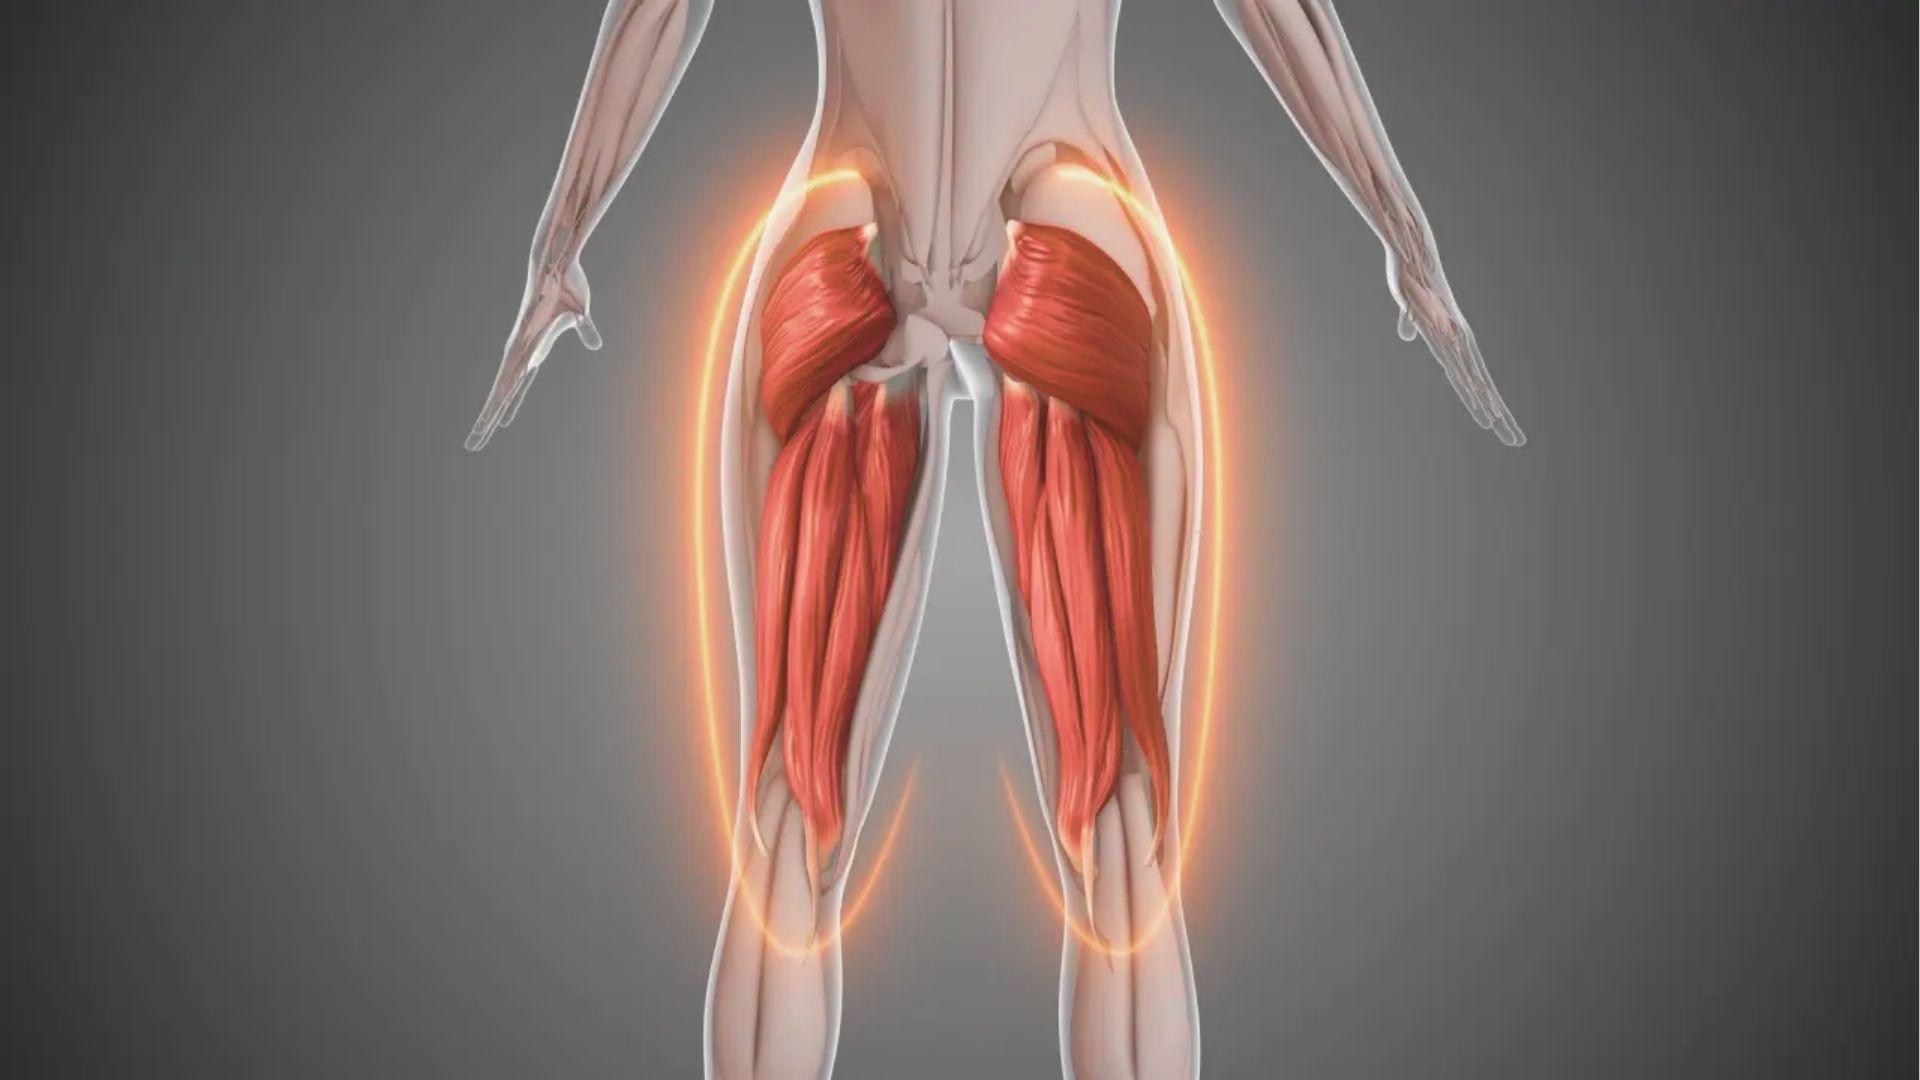
Your hip flexors and the small muscles along your spine work hard during this exercise. They keep your pelvis from tilting and your back from arching.
Pelvic Floor Engagement
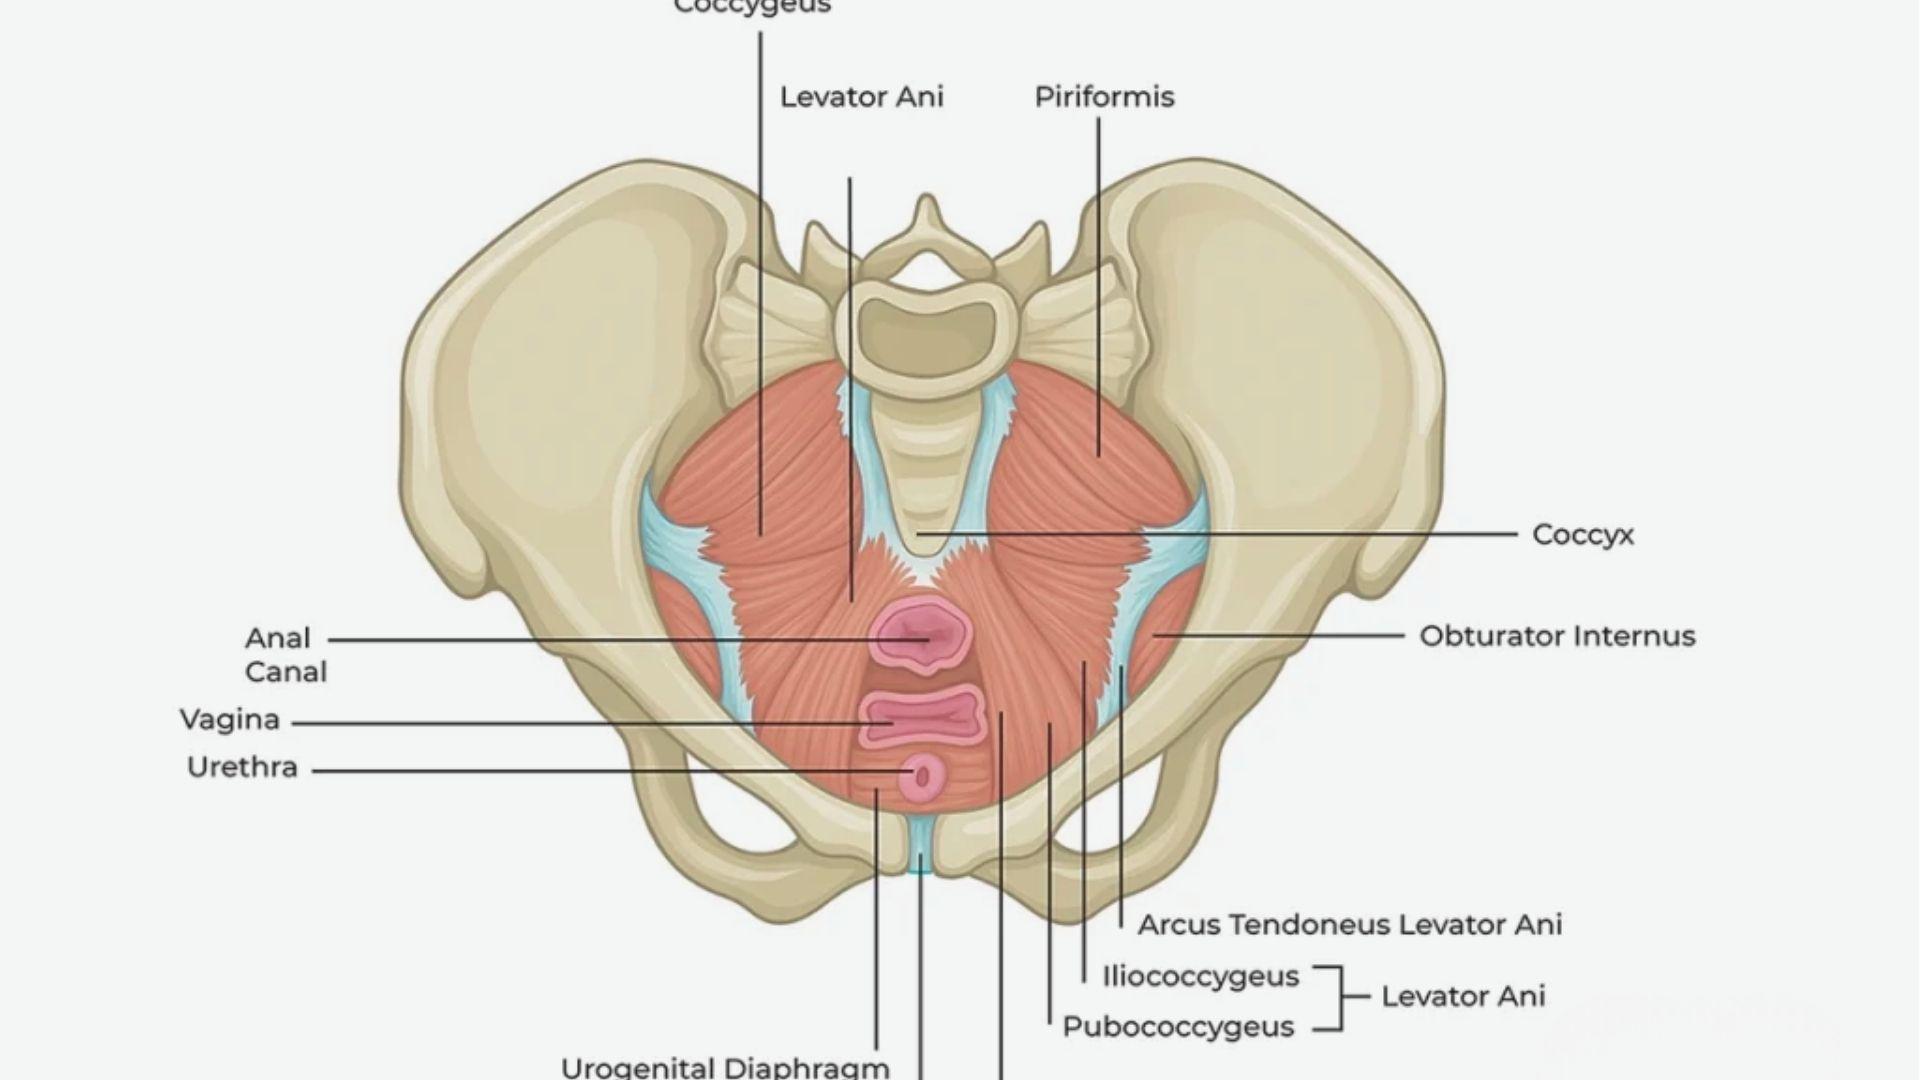
The pelvic floor connects to your deep core. When you brace properly during the dead bug, you gently activate these muscles too.
This is one reason the exercise is used in postpartum recovery and pelvic rehab programs.
How to Master Dead Bug Exercise Form Step by Step
How to Master Dead Bug Exercise
This is the most important section. Take your time with each step.
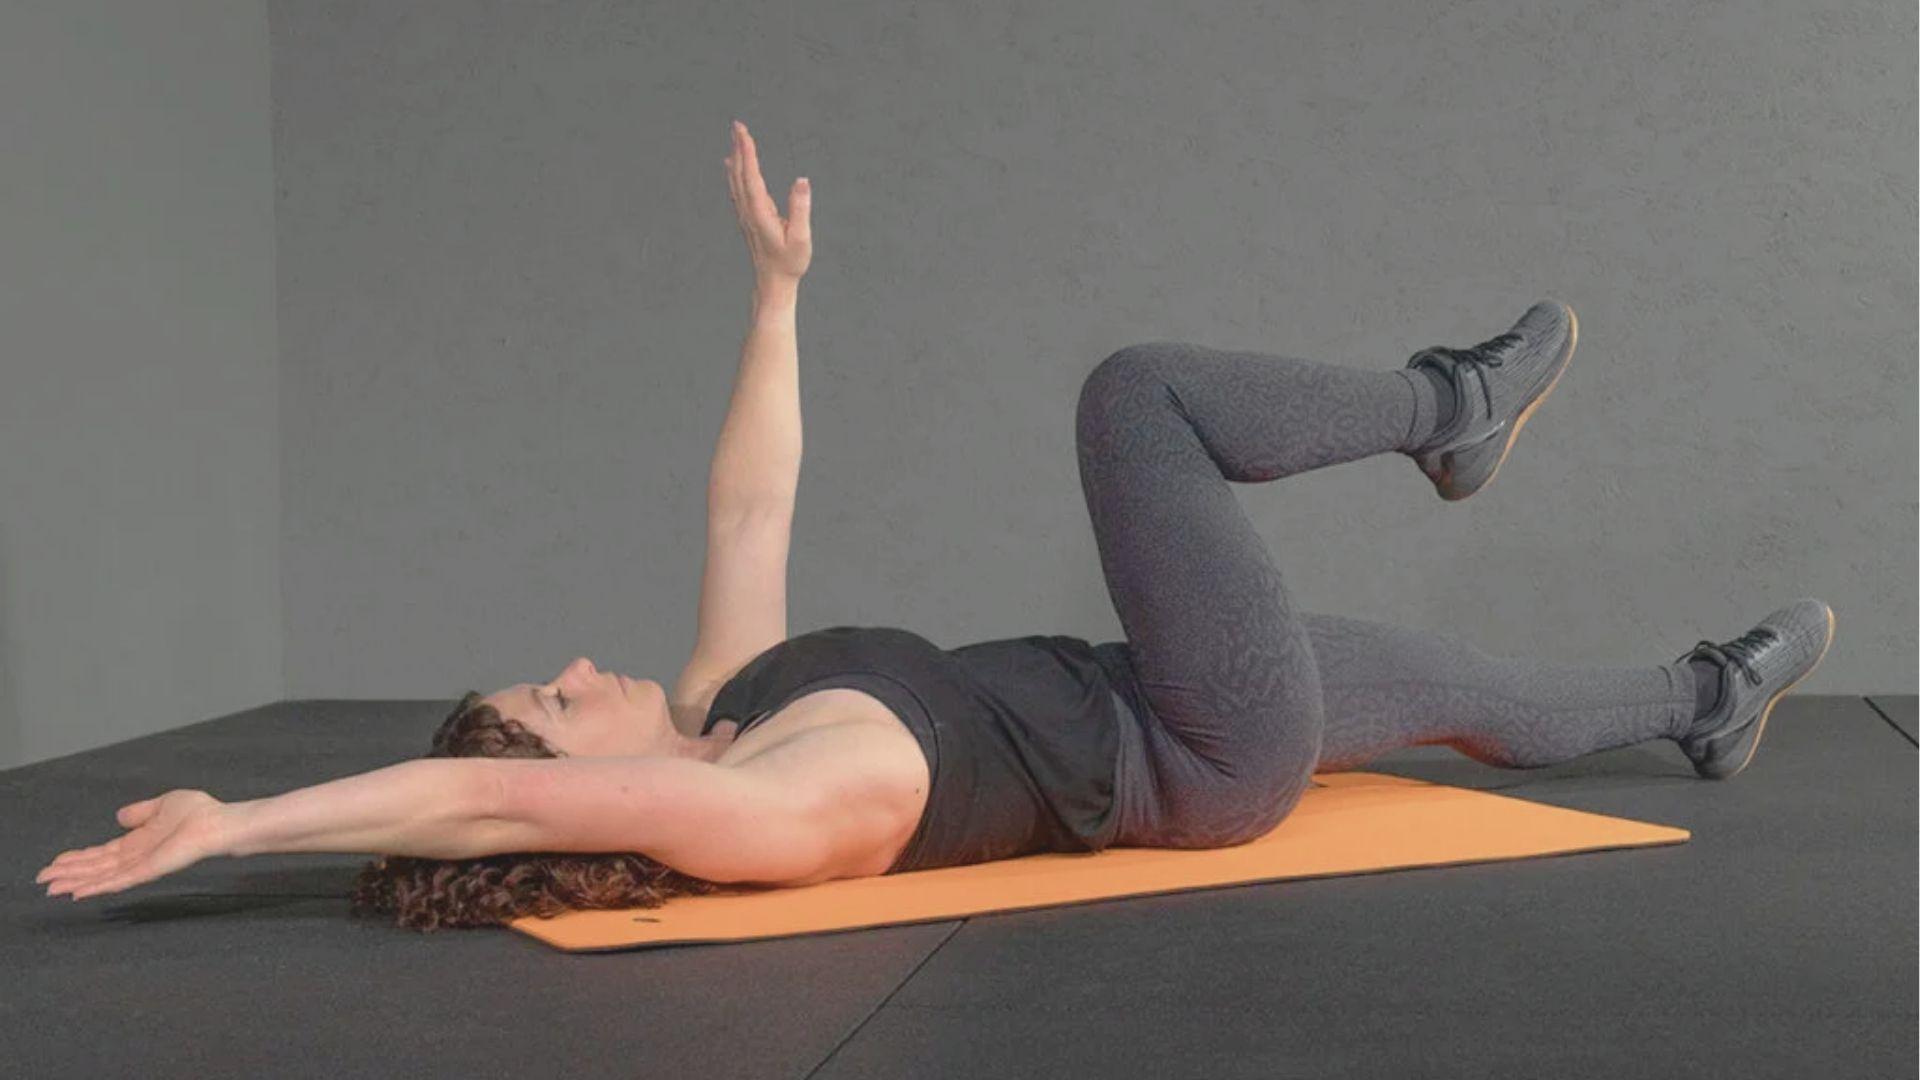
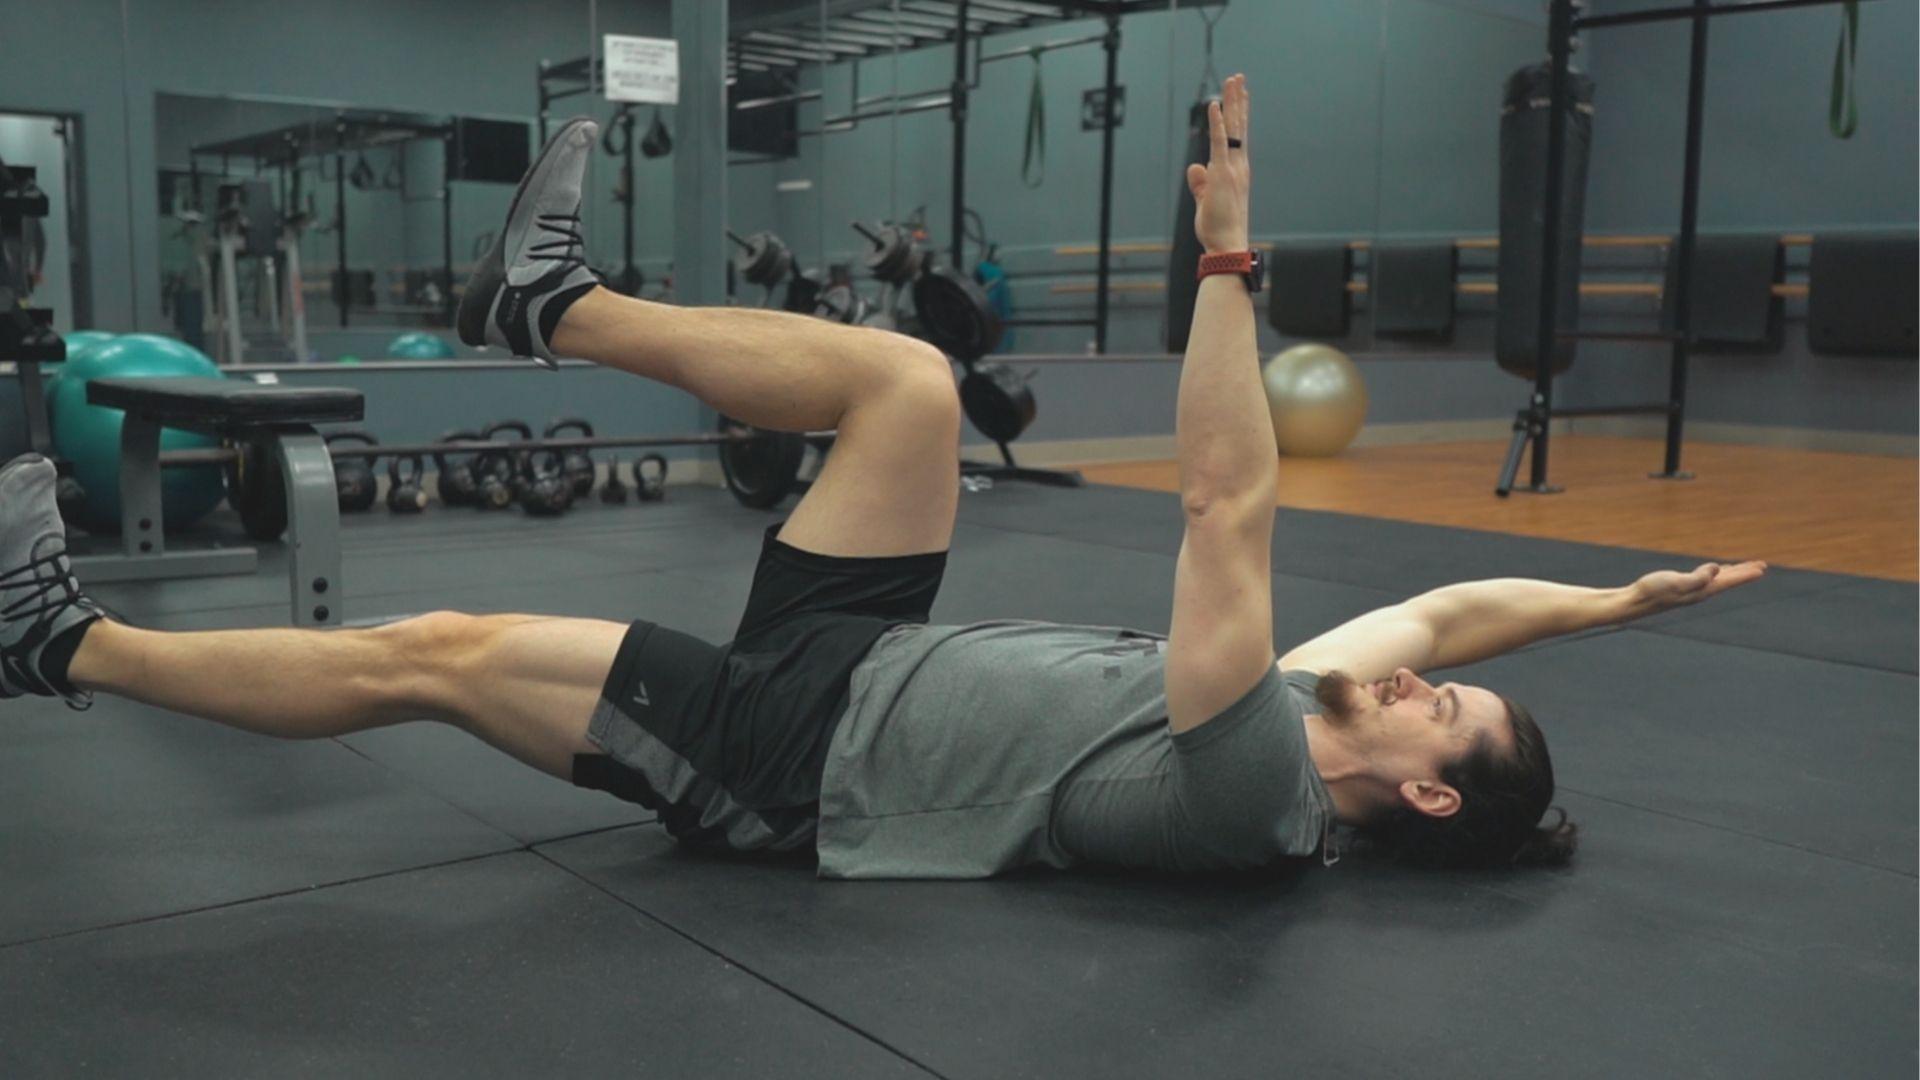
Step 1: Set Up in the Correct Starting Position
Lie flat on your back on a mat. Raise both arms straight up toward the ceiling. Lift both knees so your hips and knees are both at 90 degrees. Your shins should be parallel to the floor. This is your starting position.
Step 2: Brace Your Core and Flatten the Lower Back
Before you move anything, press your lower back gently into the mat. There should be no gap between your back and the floor. Take a breath in, then exhale and brace your core. Think of pulling your belly button toward your spine.
Step 3: Extend the Opposite Arm and Leg Slowly
While keeping your core tight, slowly lower your right arm toward the floor above your head. At the same time, extend your left leg out straight, lowering it toward the floor. Move slowly and with full control.
Do not let your lower back lift off the mat.
Step 4: Keep Your Hips and Spine Stable
Your hips should stay completely still. Your spine should stay neutral. If your lower back arches or your hips rotate, that means your core has stopped working. Stop, reset, and try again.
Step 5: Return to the Starting Position With Control
Bring your arm and leg back to the starting position just as slowly as you lowered them. Do not drop them or use momentum. Control the movement in both directions.
Step 6: Alternate Sides and Maintain Steady Breathing
Switch to the left arm and right leg. Repeat the same controlled movement. Keep breathing throughout. Do not hold your breath. Alternate sides for your chosen number of reps.
Breathing Tips for Better Dead Bug Exercise Form
Small changes in how you breathe can make a big difference in how your core performs.
- Inhale before the movement starts and exhale as you extend your arm and leg. This breathing pattern builds intra-abdominal pressure that supports your spine right when it needs it most.
- Your diaphragm is part of your core system, not just a breathing muscle. When it works together with your pelvic floor and deep abs, it creates a much stronger and more stable base.
- Correct breathing keeps your core tight from the inside out. Without it, your muscles cannot generate the same level of control during each rep.
- Many people hold their breath mid-rep without even noticing it. This raises blood pressure and weakens your core control, making the exercise far less effective.
- If you catch yourself holding your breath, slow the movement down right away. Focus on a steady exhale during each extension until the breathing pattern feels natural.
Beginner Modifications for the Dead Bug Exercise
If the full version feels too hard, start here.
Keeping the Feet on the Floor
Instead of lifting both knees up, keep your feet flat on the floor. Just move one arm at a time while keeping everything else still. This is a great starting point.
Moving One Limb at a Time
Instead of moving the opposite arm and leg together, just lower one arm. Get comfortable with that. Then add the leg. Build the coordination gradually.
Reducing Range of Motion
You do not need to fully extend your arm or leg. Lower them halfway and hold briefly. As you get stronger, increase the range slowly.
Slowing Down Each Repetition
Take 5 to 10 seconds for each extension and return. The slower you go, the more your muscles have to work.
Common Dead Bug Exercise Form Mistakes
Knowing what goes wrong helps you fix it before it becomes a habit.
- Letting the lower back lift off the mat is the most common error people make. Once that happens, the deep core muscles switch off and the hip flexors take over all the work.
- Moving too fast through each rep removes most of the muscle challenge. Aim for 3 to 5 seconds on every extension so your core actually has to work.
- Reaching too far with your arm or leg causes your hips to rotate and your back to arch. Only move as far as your body can stay stable, and build range of motion gradually.
- Bracing at the start and then relaxing halfway through the rep is a very common mistake. Your core needs to stay tight for the full movement, not just the first second.
- Swinging your limbs uses momentum instead of muscle control. Treat every single rep as a slow and intentional movement to get the most out of the exercise.
Advanced Dead Bug Exercise Variations
Once you have the basics down, these variations will push you further.
Resistance Band Dead Bug

Hold a resistance band anchored overhead while extending your legs. This adds tension to your arms and challenges your core to resist pulling forces.
Weighted Dead Bug

Alt Text:
Hold a light dumbbell in each hand. The added weight increases the demand on your core and shoulder stability.
Stability Ball Dead Bug
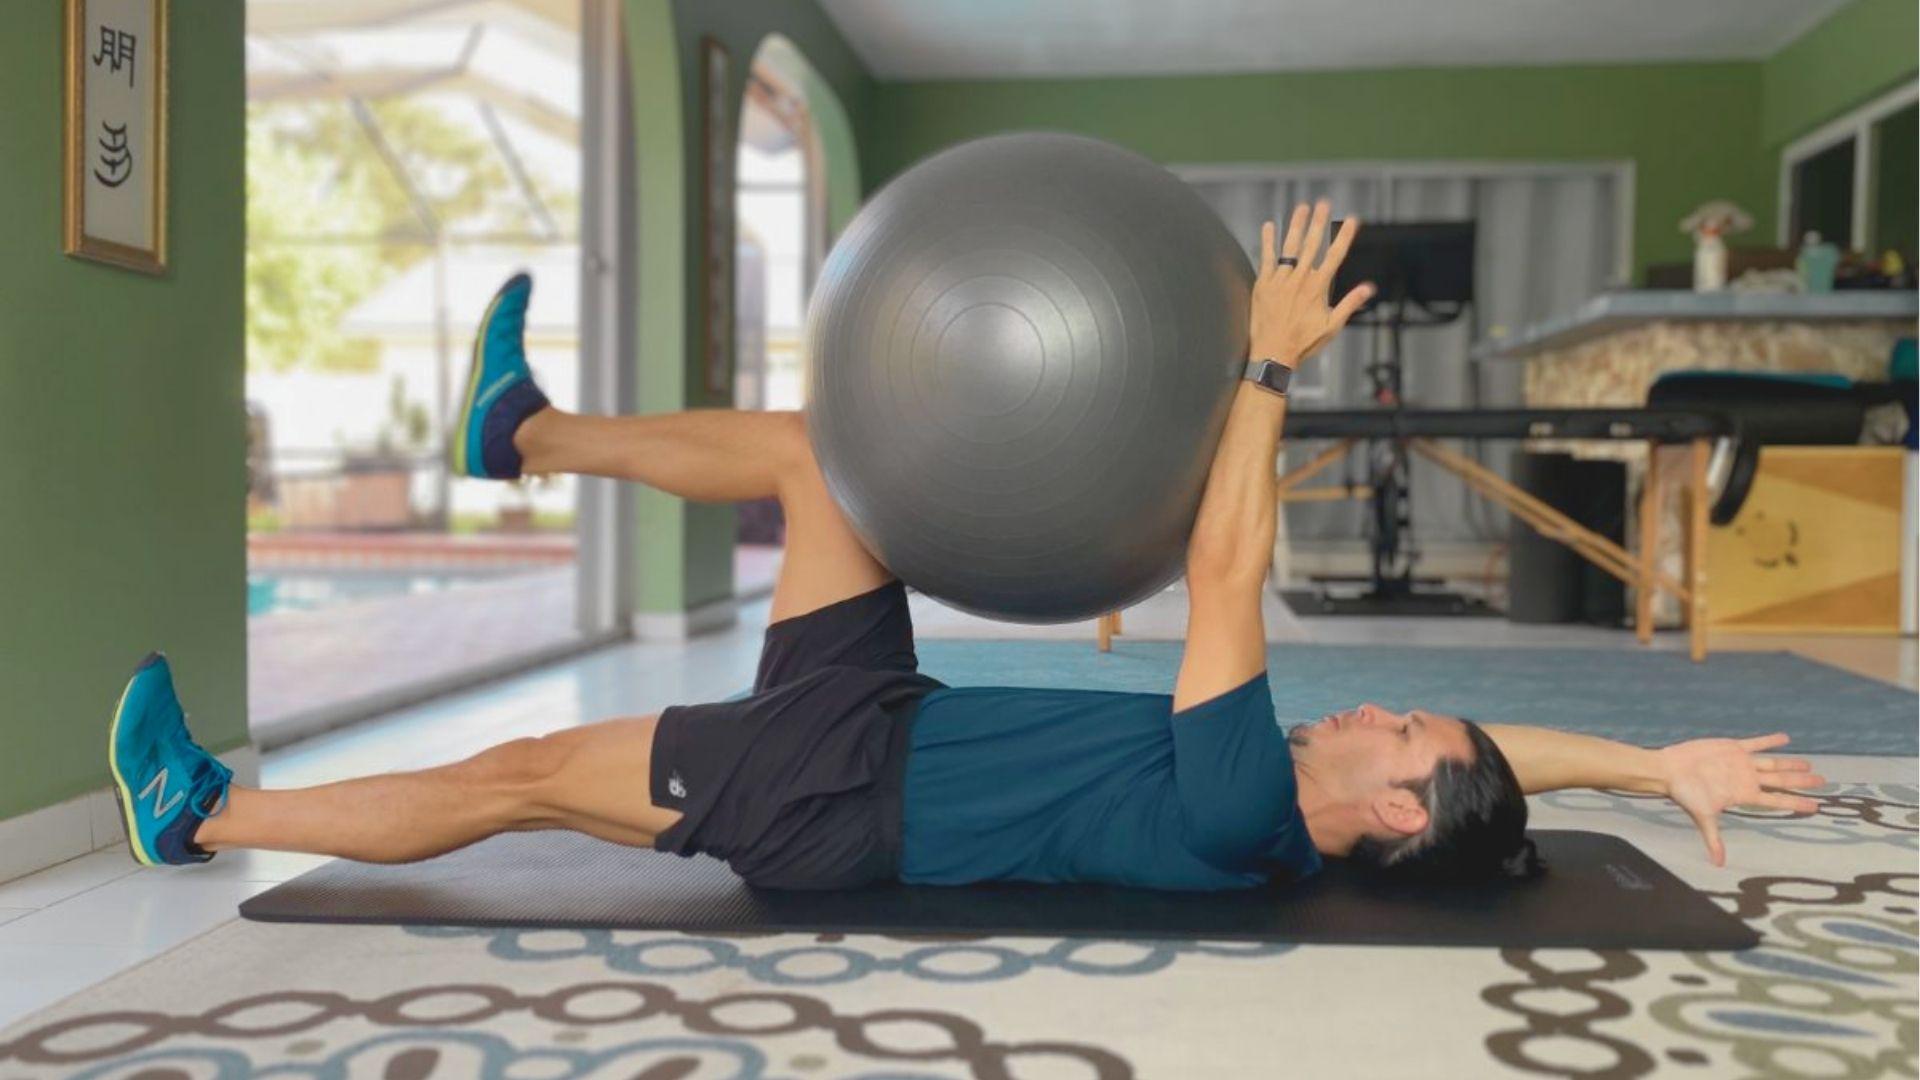
Alt Text:
Press a stability ball between your hands and knees. As you extend one arm and the opposite leg, keep pressing the ball. This adds a constant engagement challenge.
Ipsilateral Dead Bug Variation

Alt Text:
Instead of moving opposite limbs, move the same-side arm and leg together. This is much harder for coordination and core control.
How Many Reps and Sets Should You Do?
Beginners should start with 2 to 3 sets of 5 reps per side. Focus on quality over quantity. Rest 60 to 90 seconds between sets.
Once that feels easy, move to 8 to 10 reps per side. You can also slow the movement down or add a short pause at full extension to increase the challenge.
Aim to do dead bugs 2 to 3 times per week. Use it as a warm-up or part of a core circuit. Always take at least one rest day between sessions.
Dead Bug Exercise vs Other Core Exercises
How does the dead bug compare to other popular moves?
| Feature | Dead Bug | Plank | Crunches |
| Type of Movement | Dynamic stability | Static hold | Spinal flexion |
| Core Muscles Targeted | Deep core, transverse abdominis | Surface core, full body | Rectus abdominis |
| Lower Back Safety | Very safe | Moderate | Can increase pressure if done wrong |
| Good for Beginners | Yes | Yes | With caution |
| Builds Movement Control | Yes | No | No |
| Best For | Core stability during movement | Core endurance | Front abdominal strength |
| Lower Back Support | Strong benefit | Moderate benefit | Low benefit |
| Rehab Friendly | Yes | Sometimes | Not always |
Safety Tips and Precautions
Knowing when to slow down is just as important as knowing how to do the exercise right.
- Watch your lower back closely. If it lifts off the mat during any rep, stop and reset before continuing. This is the most common sign that your core has lost control.
- Pay attention to your hips. Any rotation or shifting means your stabilizing muscles are no longer doing their job. Reduce your range of motion and focus on staying still.
- Do not ignore neck or shoulder strain. These areas should not feel tense or tired during this exercise. If they do, your form needs to be corrected right away.
- Keep breathing throughout every rep. Holding your breath is a sign you are working beyond your current control level. Slow down and match your breathing to your movement.
- Stop immediately if you feel sharp pain. Mild muscle fatigue is normal, but pain in your lower back, hips, or pelvis is not. Anyone with a recent injury, herniated disc, or diastasis recti should speak to a doctor or physical therapist before starting this exercise.
Best Ways to Add Dead Bugs to Your Workout Routine
The dead bug fits well into almost any routine. Use it as a warm-up before squats, deadlifts, or presses to activate your core without wearing yourself out.
It also works great in a superset with rows or overhead presses to keep your core engaged during strength training.
For those recovering from a back injury, it is one of the safest and most effective moves to rebuild core function early in rehab.
Conclusion
I remember struggling with lower back tightness years ago and feeling like no exercise was actually helping. Then I started doing dead bugs consistently, and things began to shift. It is not flashy. It does not look impressive. But it works.
If you are just starting out, be patient with yourself. Good form takes practice.
Try it this week and see how it feels. Leave a comment below with how it goes, or share this post with someone who could use a stronger core.
Frequently Asked Questions
Is the dead bug exercise good for beginners?
Yes, it is one of the best beginner core exercises. You can modify it easily by reducing range of motion or moving one limb at a time until you build strength and coordination.
How long should I hold each rep of the dead bug?
Aim to take 3 to 5 seconds to lower your arm and leg, then return at the same pace. There is no need to hold at the bottom unless you want an extra challenge.
Can the dead bug exercise help with lower back pain?
It can help in many cases because it strengthens the muscles that support the spine. However, if your pain is severe or has a specific cause, check with a healthcare professional before starting.
How is the dead bug different from bird dogs?
The bird dog is done on hands and knees, while the dead bug is done lying on your back. Both train core stability, but the dead bug makes it easier to keep your lower back flat and controlled.
How many times a week should I do dead bugs?
Two to three times per week is a solid starting point. This gives your muscles enough time to recover while still building strength and control over time.