Learn how to do cable side leg raises with perfect form. Step-by-step cues, muscles worked, mistakes to avoid, and injury-prevention tips.
Want stronger hips and better balance? Cable side leg raises might be exactly what you need. This exercise targets your outer glutes and helps prevent injuries during daily activities and sports.
I’ve been coaching this movement for years, and I’ve seen how it fixes common hip weaknesses that cause pain and instability. In this guide, you’ll learn the proper form, common mistakes to avoid, and how to program this exercise into your routine.
We’ll cover the muscles worked, equipment setup, step-by-step instructions, variations, and who benefits most from this movement. My experience shows that mastering this exercise creates a solid foundation for lower-body strength.
What Are Cable Side Leg Raises?

Cable side leg raises are a hip abduction exercise using a cable machine and ankle strap. You stand sideways to the machine and lift your leg away from your body against resistance.
This creates constant tension throughout the entire movement. The exercise targets the side of your hip and outer glute muscles. It’s performed while standing, which also challenges your balance and core stability.
Cables provide steady resistance that doesn’t change throughout the lift. Unlike dumbbells or bodyweight, the tension stays consistent from start to finish. This constant pull makes your muscles work harder during the entire range of motion.
The cable also allows you to adjust resistance easily by moving the pin. You can start light and gradually increase weight as you get stronger.
Benefits of Cable Side Leg Raises
This exercise builds stronger hips, better balance, and protects you from common lower-body injuries.
- Strengthens the muscles that keep your hips level when you walk, run, or stand on one leg
- Targets the gluteus medius, which controls sideways leg movement and supports proper knee alignment
- Improves stability for daily activities like climbing stairs, walking on uneven ground, and playing sports
- Protects your knees, ankles, and lower back by preventing your knees from caving inward during movements
- Reduces the risk of IT band syndrome and runner’s knee by building a stable lower-body foundation
Cable Side Leg Raises Muscles Worked

Cable Side Leg Raises primarily work the gluteus medius, with support from the gluteus minimus, TFL, and core stabilizers.
Primary Muscle Gluteus Medius
The gluteus medius does most of the work during cable side leg raises. This fan-shaped muscle covers the outer surface of your pelvis and contracts to lift your leg sideways.
Strengthening it improves hip function and lower-body mechanics.
Secondary Muscles Involved
The gluteus minimus beneath the medius also activates during this movement. Your tensor fasciae latae (TFL) on the front-outer hip assists with lifting.
The gluteus maximus provides support, especially at the top of the movement.
Core and Stabilizer Muscle Activation
Your core muscles engage to keep your torso upright during the exercise. The obliques on your standing side prevent your body from leaning.
Your hip stabilizers on the supporting leg maintain balance throughout the set.
Equipment Setup for Cable Side Leg Raises

Cable Machine and Ankle Strap Setup
Attach an ankle strap to the low pulley of a cable machine. The cable should be at the lowest position on the tower.
Secure the strap snugly around your ankle but not so tight it cuts off circulation. Make sure the strap won’t slip during the exercise. Test it with a few practice movements before starting your working sets.
Proper Body Position and Stance
Stand sideways to the cable machine with your strapped leg farther from the tower. Position yourself far enough away that the weight stack doesn’t touch down between reps.
Keep your feet hip-width apart on your standing leg. Hold the machine’s frame or a support pole with one hand for balance. Stand tall with your shoulders pulled back and down.
How to Do Cable Side Leg Raises (Step-by-Step)
Cable Side Leg Raises Exercise Guide (Step-by-Step)” clearly tells readers it’s a detailed, easy-to-follow tutorial for performing cable side leg raises correctly.
Step 1: Attach the Ankle Strap

Wrap the ankle strap around your outer ankle and secure the Velcro firmly. The strap should sit just above your ankle bone. Make sure the cable attachment point faces the machine.
Give it a gentle tug to confirm it’s secure. Adjust the fit if needed before moving into position.
Step 2 :Correct Standing Position

Stand sideways to the cable machine on your non-working leg. Place your feet together or keep them slightly apart for better balance.
Your working leg (with the strap) should be closest to the machine initially. Lightly grip the support pole or machine frame with your near hand. Keep your chest up and eyes looking straight ahead.
Step 3 :Engage Core and Maintain Posture

Tighten your abdominal muscles as if bracing for a punch. Pull your shoulder blades back and down. Keep your spine in a neutral position without arching or rounding.
Shift your weight onto your standing leg. This starting position sets you up for controlled movement.
Step 4 :Lift the Leg Laterally with Control
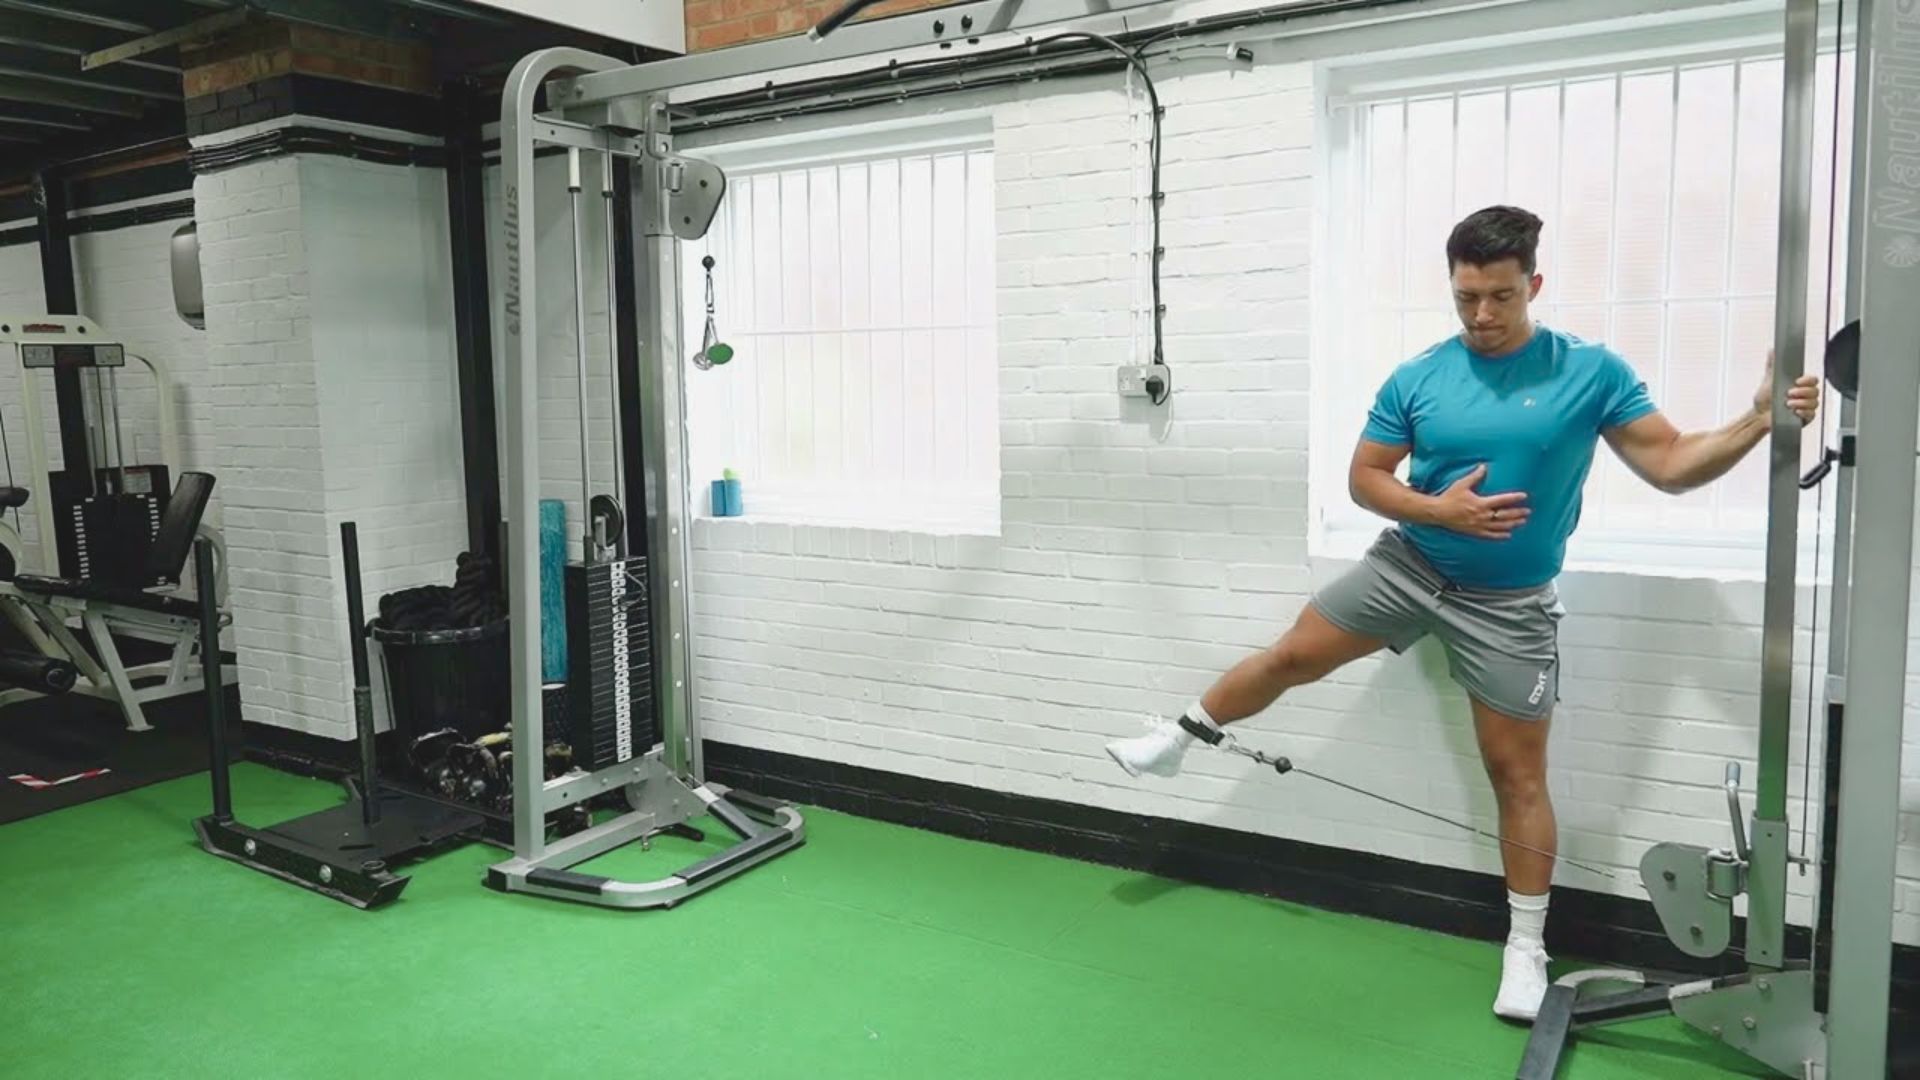
Slowly raise your working leg out to the side against the cable resistance. Keep your toe pointing forward or slightly downward, not turned up.
Lift until your leg reaches about 30 to 45 degrees from your body. Don’t let your torso lean away from the moving leg. Focus on using your hip muscles, not momentum.
Step 5 :Pause and Lower Slowly

Hold the top position for one second while squeezing your outer glute. Slowly lower your leg back to the starting position with control.
Don’t let the weight stack pull your leg down quickly. Maintain tension on the muscle throughout the entire descent. Stop just before your feet touch together.
Step 6 :Switching Sides Safely

Complete all reps on one side before switching. Remove the ankle strap carefully and attach it to your other ankle. Turn around so your other leg is now farther from the machine.
Reset your posture and hand position. Perform the same number of reps on this side.
Standing Cable Side Leg Raises Variations

Perform the exercise holding only lightly for balance to challenge stability.
Single-Hand Support Variation
Try performing the exercise with only fingertip contact on the support pole to challenge your balance more. You can also perform it completely freestanding once you’re strong enough. Start with lighter weight when reducing support.
Tempo-Controlled Repetitions
Slow down each phase of the movement for greater muscle tension. Try a 3-second lift, 2-second pause, and 3-second lower. This tempo increases time under tension and builds strength while helping you focus on perfect form.
Light vs Moderate Resistance Selection
Start with very light resistance to learn proper form and muscle activation. As you improve, gradually increase the weight while maintaining control. Moderate resistance should challenge you while allowing 12 to 15 clean reps.
Cable Side Leg Raises vs Other Hip Abduction Exercises
Cable side leg raises offer constant tension and require more balance compared to machines and bands.
|
Feature |
Cable Side Leg Raises |
Band Side Leg Raises |
Machine Hip Abduction |
|
Type of Resistance |
Constant tension throughout the movement |
Variable tension that increases as the band stretches |
Fixed machine resistance |
|
Stability Requirement |
High – requires balance and core engagement |
Moderate – depends on stance and band setup |
Low – body fully supported |
|
Muscle Activation |
Hip abductors plus core and stabilizers |
Hip abductors with some stabilizer involvement |
Primarily isolates hip abductors |
|
Resistance Adjustability |
Precise and easy to adjust |
Limited by band strength |
Precise, machine-based increments |
|
Portability |
Gym-based |
Highly portable, ideal for home workouts |
Not portable |
|
Functional Carryover |
High – standing position mimics real-life movement |
Moderate |
Lower – seated, non-functional position |
|
Best Use Case |
Overall hip strength, stability, and injury prevention |
Home workouts and warm-ups |
Focused muscle building and isolation |
Common Mistakes to Avoid
These form errors reduce muscle activation and increase your risk of injury during cable side leg raises.
- Swinging your leg up using momentum instead of controlled muscle contraction defeats the exercise purpose
- Leaning your torso away from your working leg or shifting your hips indicates the weight is too heavy
- Starting with too much resistance causes form breakdown and reduces how well your muscles activate
- Letting the weight stack pull your leg down quickly instead of controlling the lowering phase
- Forgetting to engage your core, which causes your body to shift and compensate during the movement
Conclusion
Cable side leg raises have become one of my go-to exercises for building hip strength and fixing imbalances. I’ve seen how this simple movement creates real improvements in performance and injury resistance.
Start with light weight, focus on smooth control, and gradually increase resistance as your form improves. Your hips will thank you for the extra attention.
Give this exercise a try in your next workout and let me know how it feels in the comments below. Share this guide with anyone who needs stronger, more stable hips.
Frequently Asked Questions
How often should I do cable side leg raises?
Two to three times per week works well for most people. You can do them more often with light weight for muscle activation.
Can I do cable side leg raises every day?
Yes, but only with very light resistance for activation. Heavy weights need rest days between sessions for proper recovery.
What weight should I start with for cable side leg raises?
Start with 5 to 10 pounds to learn proper form. Focus on feeling your outer glute work before adding more weight.
Are cable side leg raises good for building bigger glutes?
This exercise strengthens your outer hip but won’t build major size. Combine it with squats and hip thrusts for complete glute growth.
Can cable side leg raises help with knee pain?
Strong hip muscles can help reduce knee pain from poor alignment. Consult a healthcare professional for ongoing knee issues first.