Most people can’t do a single handstand pushup. Not because they lack strength. Because they are training it the wrong way.
I spent months kicking up against a wall with zero progress. Then I fixed my approach and everything changed.
This guide covers exactly how to do handstand pushups from scratch. Step-by-step technique, beginner progressions, common mistakes, and a sample workout you can start this week.
I have trained alongside certified calisthenics coaches and tested these methods personally. From wall handstand pushups for beginners to freestanding reps, this covers it all.
Let’s get started.
Why Most Handstand Pushup Guides Fail Beginners
Most guides online throw you straight into kicking up against a wall. No wrist prep. No shoulder mobility check. No progression structure.
That approach fails most beginners for three reasons:
- They skip prerequisite strength work entirely
- They jump to the inverted position before their shoulders are ready
- They ignore wrist preparation until something hurts
By the time pain shows up, bad habits are already baked in.
This guide does it differently. Every stage is intentional. Every step earns the next one. That is what actually gets you to your first clean rep without setbacks.
What Are Handstand Pushups?
A handstand pushup is a vertical pressing movement performed while inverted. You press your entire body weight using your shoulders, arms, and core.
Most people learning how to do handstand pushups start against a wall for balance support. As control and strength improve, you progress toward freestanding reps.
It sits at the top of the calisthenics pressing hierarchy. Strength, balance, and full-body awareness all demanded at once. That is exactly what makes it worth the effort.
Muscles Worked in Handstand Pushups

Not just a shoulder exercise. Your whole body works to keep you stable and moving cleanly.
Primary Muscles
These muscles carry the load on every rep:
- Deltoids (front and lateral heads take the most work)
- Triceps (handle the lockout at the top)
- Upper trapezius (keeps your shoulder girdle stable throughout)
Secondary Muscles
These fire constantly to keep your body aligned:
- Core (abs, obliques, transverse abdominis)
- Glutes (prevent hip sag and spinal collapse)
- Serratus anterior (protects and stabilizes the shoulder blades)
- Wrist flexors and extensors (manage ground contact and pressure)
Most beginners fail because their secondary muscles are undertrained. Build that foundation first. Everything else follows.
Benefits of Learning How to Do Handstand Pushups
The payoff goes well beyond the skill itself. Here is the real case for training this movement.
Build Strong Shoulders
You press your full body weight overhead. Over and over. Research by Brad Schoenfeld on hypertrophy mechanisms consistently shows that vertical pressing movements generate high deltoid activation. This bodyweight version delivers that same load without a barbell in sight.
Improve Overhead Strength
Learning how to do a handstand pushup for beginners trains the overhead pressing pattern under maximum load. That strength transfers directly to barbell overhead press, dumbbell pressing, and everyday movement overhead.
Develop Balance and Body Control
Being inverted challenges your nervous system in a completely new way. Proprioception sharpens fast. Coordination improves. Most gym-based exercises do not train this at all.
Increase Core Stability
There is no faking it here. A soft midsection and you collapse immediately. Every rep demands a braced, rigid core from start to finish. That carryover to other lifts is real and measurable.
Minimal Equipment Required
A floor and a wall. Full equipment list right there. No gym membership, no machines, no cables. I have done these in hotel rooms, garages, and parks. The barrier to entry is almost nonexistent.
Why the Eccentric Phase Matters More Than You Think
Here is a data point worth knowing.
Studies on eccentric training show that strength gains during the lowering phase can run 20 to 40 percent higher compared to the lifting phase alone. That is not a small margin. It is the exact reason negative handstand pushups are so effective early in this progression.
You build far more strength on the way down than most people realize. Miss this, and your progress stalls long before it needs to.
Prerequisites Before You Learn How to Do Handstand Pushups
Skip this and you will get hurt. Too many people rush ahead and pay for it with weeks off training.
Shoulder Mobility Requirements
Stand against a wall. Press your lower back flat against it. Raise both arms overhead and try to touch the wall with the backs of your hands. If you cannot do that without arching, fix shoulder mobility first.
Limited overhead range is one of the leading reasons people develop pain when learning handstand push up technique. Fix the mobility before you add the load.
Basic Strength Benchmarks
Before attempting wall handstand pushups, check these off:
- 20 clean pike pushups
- 15 to 20 standard pushups with full range
- A 30-second wall handstand hold
These numbers reflect the real base your joints and muscles need. Not optional checkboxes.
Wrist Strength and Stability
Your wrists absorb your entire body weight in this position. Build tolerance through daily wrist circles, plank holds, and bear crawl movements.
Skipping this is the fastest path to chronic wrist pain that sidelines your training for months.
Realistic Progression Timeline: How Long Each Stage Takes
Most guides skip this entirely.
Here is the honest breakdown based on training three days per week consistently:
Pike pushups (incline and box): 2 to 4 weeks. Build shoulder endurance and get comfortable with the pressing angle.
Wall walks and handstand holds: 2 to 3 weeks. About comfort inverted, not just raw strength.
Negative handstand pushups: 3 to 6 weeks. The real strength jump happens here. Do not rush past it.
Partial range reps: 2 to 4 weeks. Assembling the full movement piece by piece.
First full clean rep: 8 to 16 weeks from a zero base.
Every week of honest progression moves you closer than any shortcut will.
The Exact Point Most People Get Stuck
Here is where progress stalls for almost everyone. And almost no guide addresses it directly.
You nail the negatives. You can lower yourself slowly and under control. Then you try to press back up and nothing happens. Weeks pass. You wonder if you are doing something wrong.
You are not. This is the most common plateau in the entire progression.
Three things cause it:
Fear of pressing. Your nervous system has not learned the upward pattern yet. Start partial range pressing even when it feels too short to count.
Not enough eccentric volume. Three sets of three negatives is not enough. You need 15 to 20 total slow eccentric reps per session to build the pressing strength required.
Weak supplemental shoulder work. If your overhead press is underdeveloped, the handstand press plateaus fast. Add dumbbell pressing alongside your skill work.
The fix is not pushing harder. Address all three and the plateau becomes temporary instead of indefinite.
How to Do Handstand Pushups Step-by-Step

Here is where it all comes together. Follow each step in order. No skipping.
Step 1: Position Your Hands
Place your hands 6 to 8 inches from the wall. Keep them just outside shoulder width. Spread your fingers wide and press through your full palm. Full palm contact reduces wrist strain and gives you the most stable base possible.
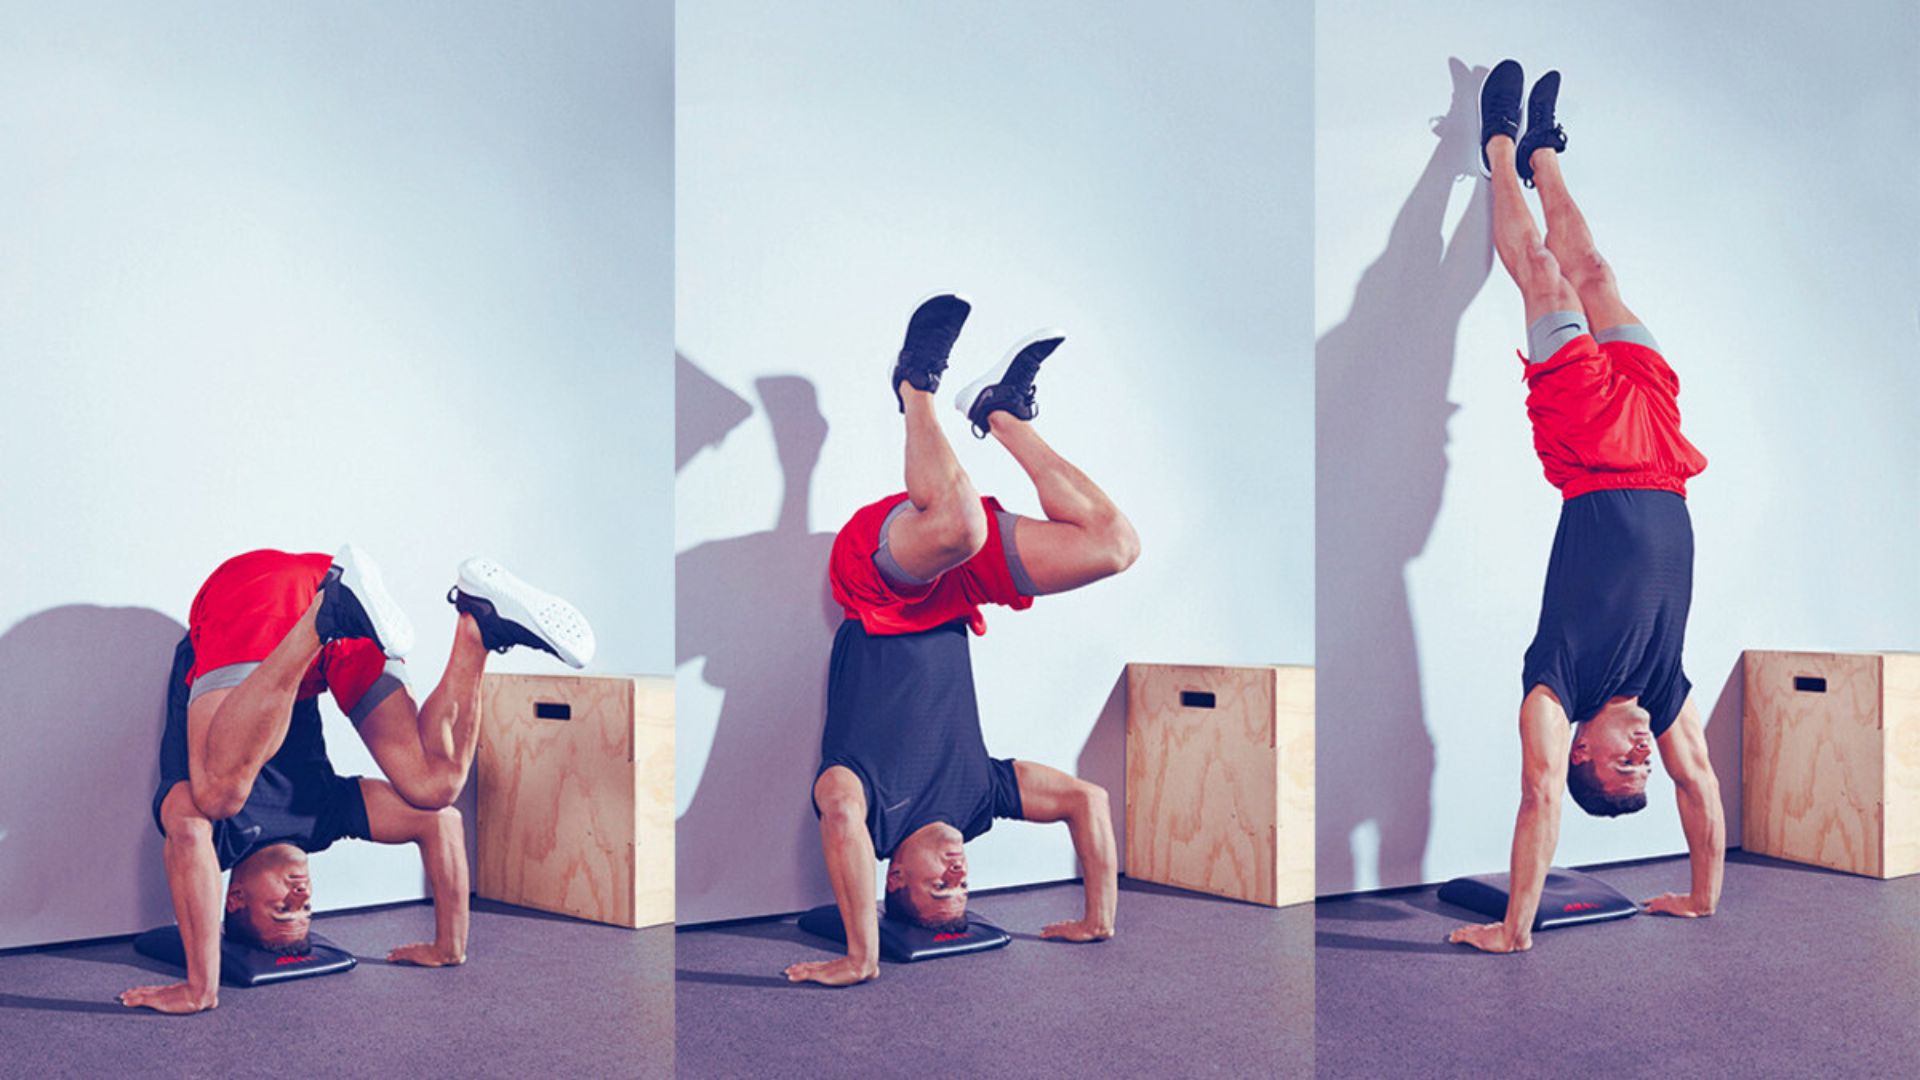
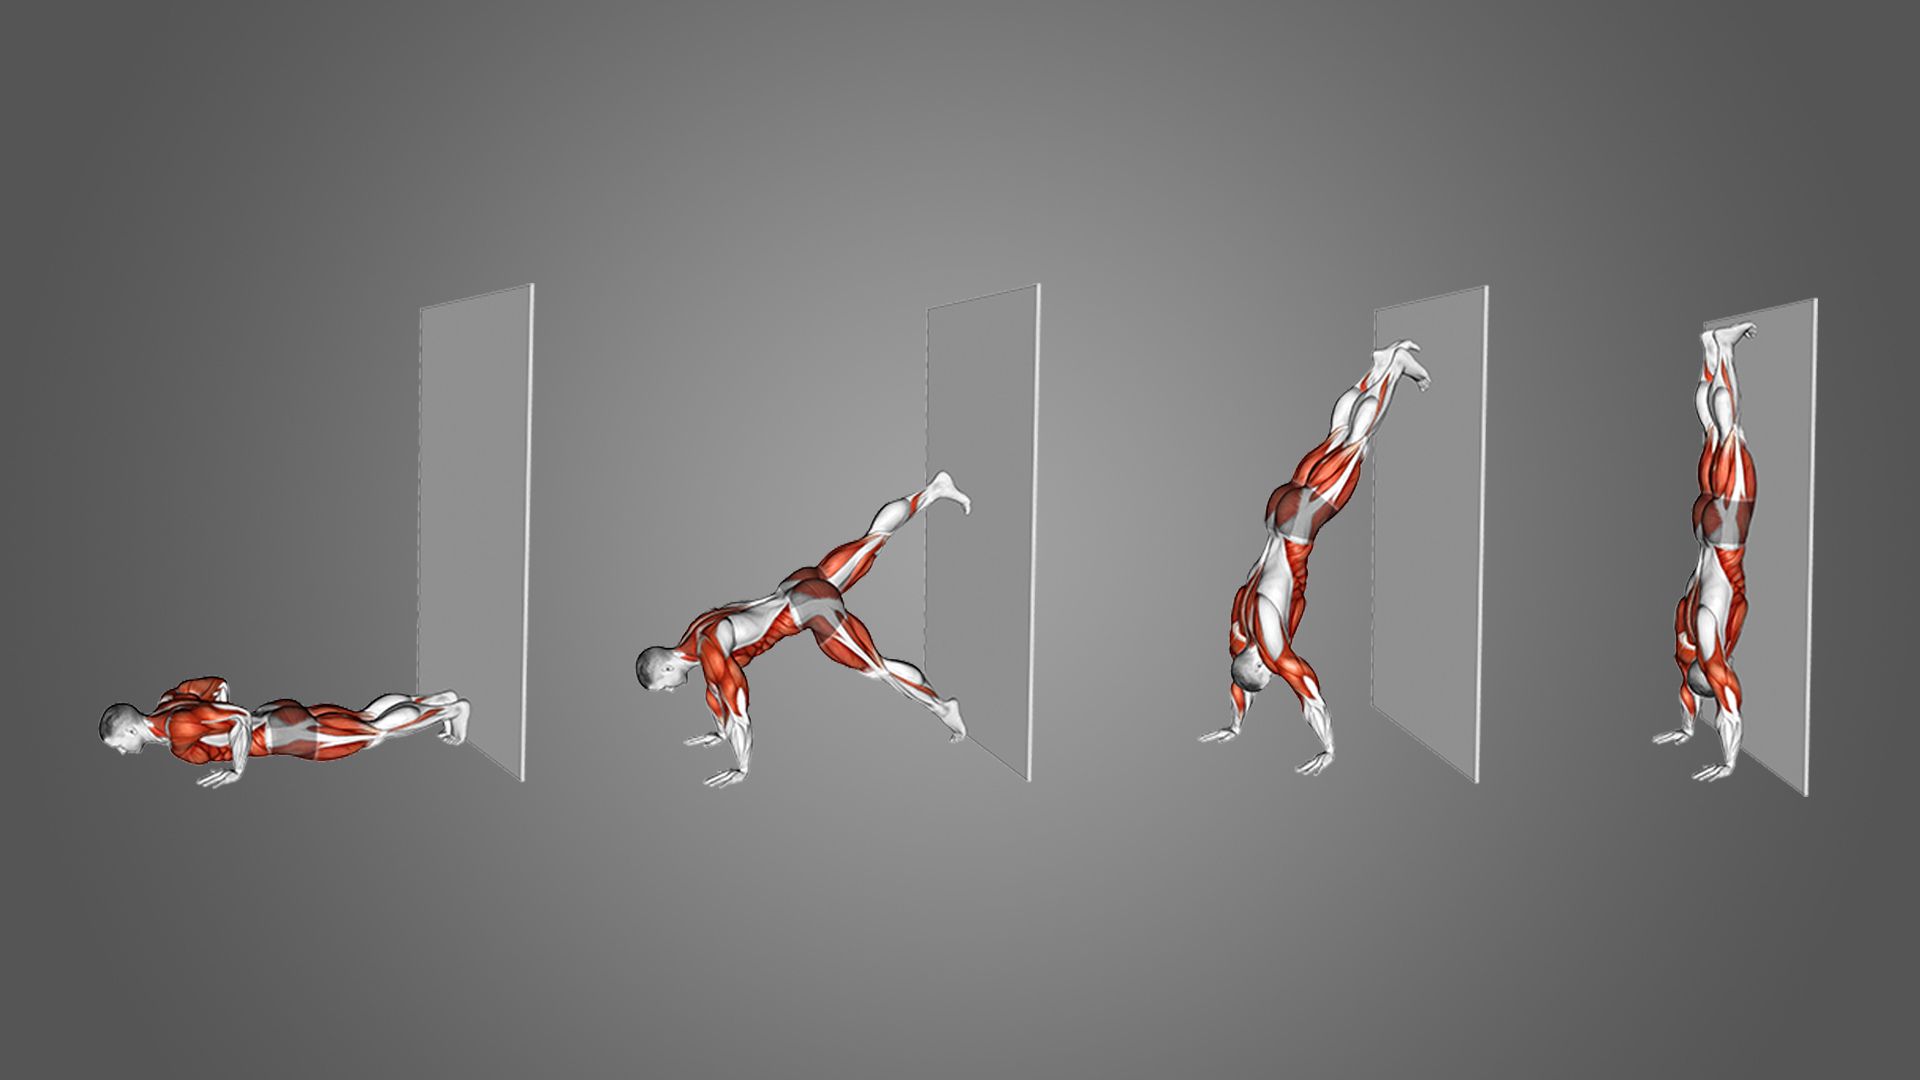
Step 2: Kick Up Into a Handstand Against a Wall
From standing, place your hands down and kick one leg up, then the other. Get your heels resting against the wall. Your body forms a straight line from hands to heels. Avoid letting your hips drift forward or your lower back arch out.
Step 3: Engage Core and Glutes
Before you lower yourself, lock everything in. Hard abs. Squeezed glutes. Legs pressed together. One rigid plank, not a chain of loose segments. That is what separates a controlled rep from a wobbly one.
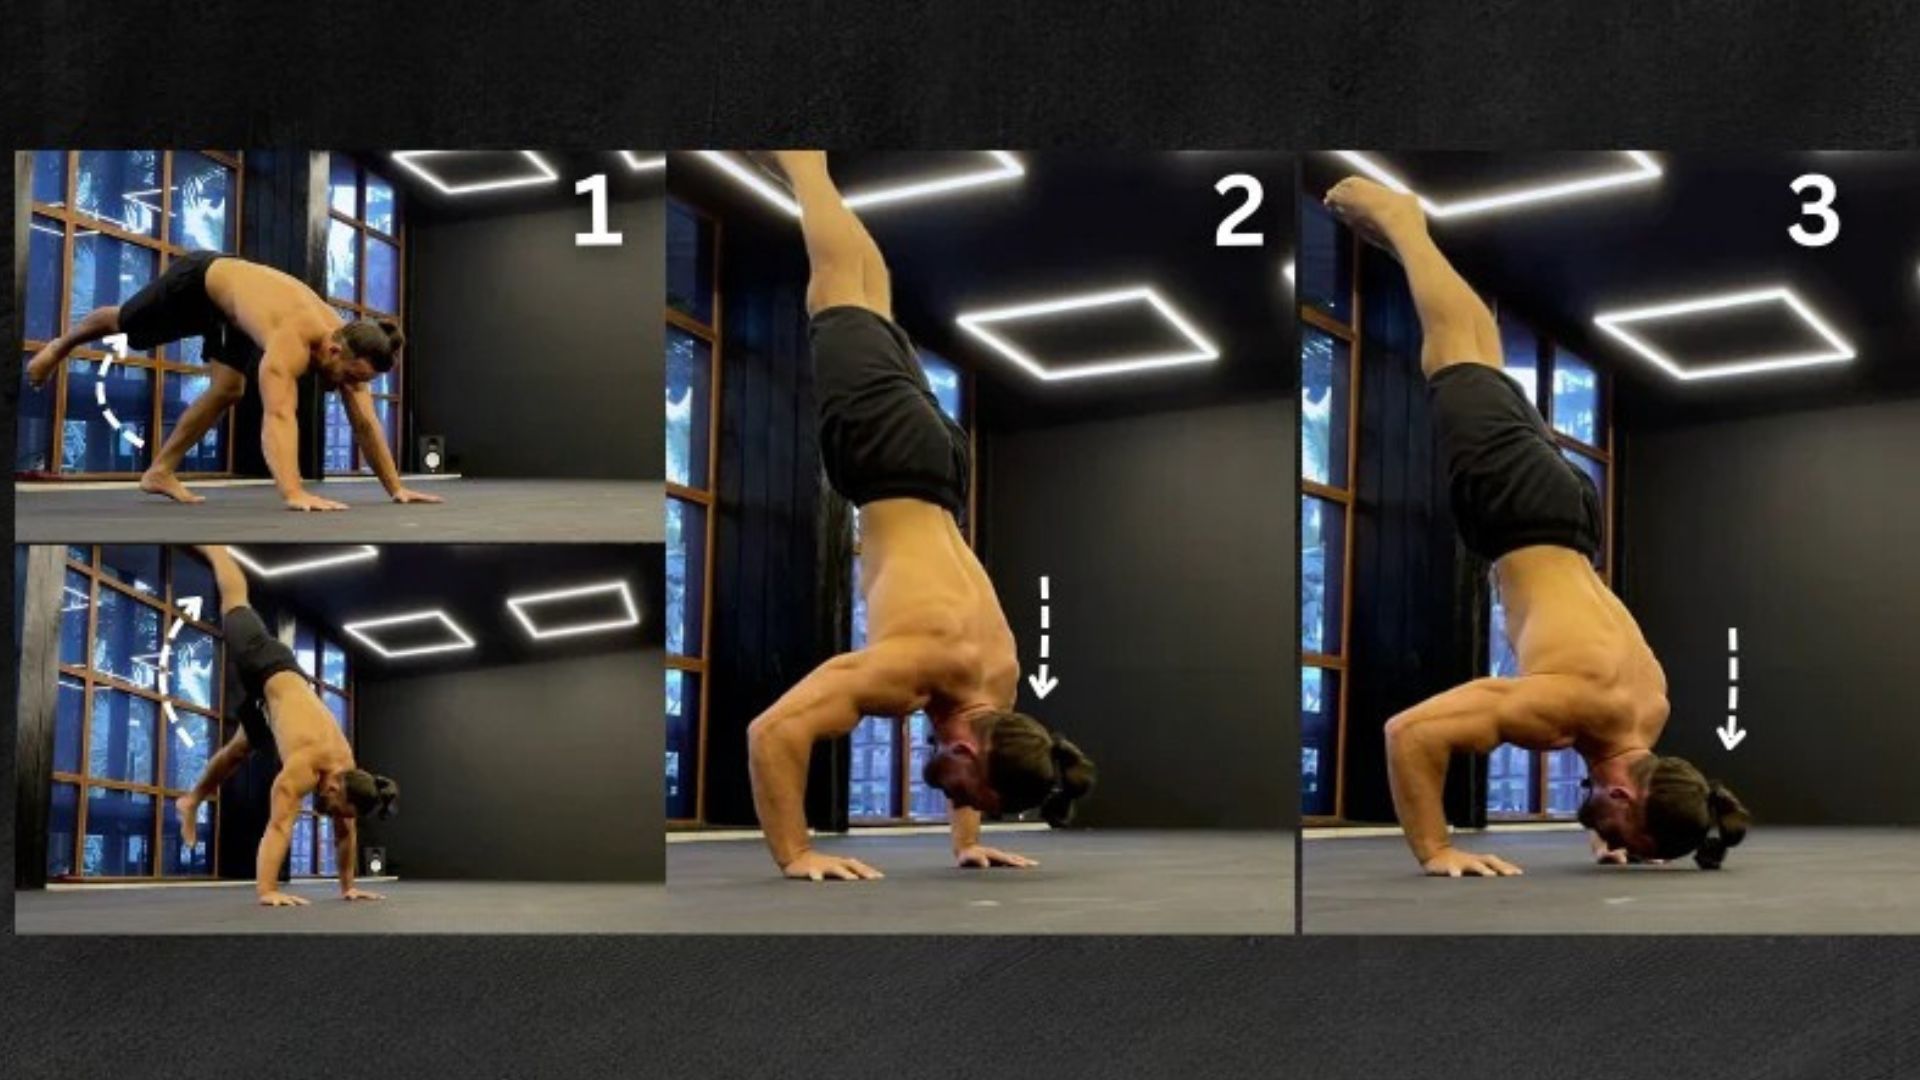
Step 4: Lower Yourself Slowly
Bend your elbows and descend under full control. Aim for a 3-second lowering phase. Do not drop. Lower until your head lightly touches the floor or a folded mat.
Step 5: Press Back Up to the Start Position
Drive through your palms and press to full arm extension. Lock out at the top. That is one rep. If pressing back up is not possible yet, do negatives only and build from there using the progressions below.
How Beginners Can Progress to Handstand Pushups
A clear, ordered path from zero to your first rep. Learn handstand pushups step by step through these progressions in this exact sequence.
Incline Pike Pushups

Hands on the floor, feet on a low surface. Hips elevated in an inverted V. Your first real introduction to vertical pressing load. Build here for 2 to 4 weeks before moving forward.
Box Pike Pushups

Feet go higher, on a box or chair. Torso becomes more vertical. The closest ground-based exercise to actual handstand push up technique before going fully inverted.
Wall Walks
Start in a pushup position with feet at the base of a wall. Walk your feet up as your hands walk back toward the wall. Get as vertical as possible, hold briefly, then walk back down. Builds inverted comfort and shoulder endurance at the same time.
Negative Handstand Pushups
Here is where things change.
Kick up into your wall handstand. Slowly lower your head to the floor over 5 to 10 seconds. Do not press back up. Step down and repeat.
Eccentric training research, supported by work from researchers like Per Tesch and replicated across multiple resistance training studies, confirms that slow eccentric loading produces greater strength gains per rep than concentric work alone.
This is the turning point in the whole progression. Treat it with that level of respect.
Partial Range Handstand Pushups
Once negatives feel controlled, start pressing halfway back up. Add range gradually over several weeks. Rushing this phase is exactly what causes the plateau described above.
Wall Handstand Pushups vs Freestanding Handstand Pushups
Same movement on the surface. Entirely different challenge underneath.
Wall-supported reps let you focus purely on pressing strength. The wall handles your balance. That focused stimulus is exactly why the wall version builds raw shoulder power so effectively.
Freestanding handstand pushups add balance as a full separate skill layered on top of the pressing demand.
Your wrists, fingers, and core all have to work simultaneously while you are also pressing. Nothing catches you if you drift.
Most athletes need 3 to 6 months of strong wall reps before freestanding attempts feel realistic.
Even experienced calisthenics athletes cycle back to wall reps regularly for strength volume. One version does not replace the other.
Common Mistakes When Learning How to Do Handstand Pushups
Recognizing these early saves months of frustration. Most people only spot them after the damage is done.
Arching the Lower Back
Core goes soft, hips push forward, lower back caves. The load shifts off your pressing muscles and onto your spine. Squeeze glutes and brace abs before every rep, not just when it gets hard.
Not Using Full Range of Motion
Partial reps produce partial results. Going to full depth, head to floor, is what builds real pressing strength. Stop cutting it short.
Placing Hands Too Wide
Wider feels stable at first. It is not. A wide grip reduces pressing power and places your shoulder joints in a compromised position under load. Hands just outside shoulder width. No wider.
Poor Core Engagement
A loose core in a handstand is like pressing through sand. Everything destabilizes immediately. Lock your core before you kick up, not partway through the set.
Rushing the Progression
Most people get stuck here. The urge to skip pike pushups and jump straight to negatives is strong. That shortcut leads to shoulder strain and month-long setbacks. Every progression exists for a structural reason. Respect the order.
Tips to Improve Handstand Pushup Strength Faster
Smart habits compound. These are the ones that actually move progress forward week over week.
- Train three times per week with rest days between sessions. Shoulders need recovery time to grow stronger.
- Do wrist mobility work before every session. Five minutes. Not optional.
- Film your reps every session. Errors visible on video are often invisible when you are performing the movement.
- Add dumbbell or barbell overhead pressing to build supplemental shoulder strength alongside this skill work.
- Spend more training time on the lowering phase than the pressing phase. The eccentric builds strength faster at this stage.
- Use a folded mat under your head during training. It protects you and keeps depth consistent across every session.
- Log your reps weekly. Small increases compound fast over 8 to 12 weeks.
Consistency across two months beats intensity across two weeks. Every single time.
Sample Beginner Workout to Learn Handstand Pushups
Three days per week. Eight to twelve weeks minimum. Log every session.
Day 1 (Strength Focus):
- Wrist warmup: 2 minutes of circles and wrist stretches
- Box pike pushups: 4 sets of 8 to 10 reps
- Wall walks: 3 sets of 3 reps
- Wall handstand hold: 3 sets of 20 seconds
Day 3 (Eccentric Focus):
- Wrist warmup: 2 minutes
- Incline pike pushups: 3 sets of 15 reps
- Negative handstand pushups: 4 sets of 3 reps, 5-second descent
- Plank hold: 3 sets of 30 seconds
Day 5 (Volume and Range):
- Wrist warmup: 2 minutes
- Partial range handstand pushups: 4 sets of 5 reps
- Wall handstand hold: 3 sets of 30 seconds
- Shoulder mobility work: 5 minutes
Add one rep or one second per week wherever possible.
After 10 weeks, those small increases are the difference between struggling with negatives and landing your first full rep.
Are Handstand Pushups Safe for Beginners?
Yes. With the right foundation in place.
Wrist strain and shoulder impingement are the two main risks. Both are almost always caused by skipping progressions or going inverted too early.
Follow the order in this guide and those risks drop significantly.
If you have a history of rotator cuff injuries, shoulder impingement, or chronic wrist problems, speak to a physiotherapist before training any inverted pressing work.
For healthy beginners on a structured plan, this movement is safe, effective, and absolutely worth the effort.
Use a mat under your head, train on a non-slip surface, and never kick up when fatigued. Safety comes from preparation and consistency, not from avoiding the movement altogether.
Conclusion
Handstand pushups are a real measure of pressing strength, patience, and body control.
I started exactly where most of you are right now. No balance, no pressing ability, no clear starting point. A structured progression changed that completely. It will for you too.
Each stage in this guide builds directly on the one before it. Your shoulders and wrists will adapt at their own pace, and that pace is perfectly fine. Do not compare your timeline to anyone else’s.
Come back to this guide whenever you hit a plateau or need a reminder of the next step. You have everything you need to get there.
Start today. Your first goal is 20 clean pike pushups. Hit that consistently, then come back and move to the next stage.
So, where are you starting your handstand pushup training today?
Frequently Asked Questions
How long does it take to learn handstand pushups from scratch?
Most people hit their first clean rep within 2 to 6 months with consistent training three times per week. Starting shoulder strength and how closely you follow a structured progression are the two biggest factors in that timeline.
Can complete beginners learn handstand pushups without any gym experience?
Yes, but starting at the right entry point matters. Incline pike pushups and wall walks come first. Building wrist and shoulder strength before going inverted makes the whole process safer and faster.
What is the difference between handstand pushups and pike pushups?
Pike pushups keep your feet on the ground at reduced load. Handstand pushups are fully inverted and require pressing your complete body weight. Pike pushups are the structured step toward the full movement.
How many days per week should beginners train handstand pushups?
Three sessions per week with rest days in between works best. That frequency builds the skill while giving your shoulders and wrists enough recovery time between sessions.
Why do my wrists hurt when practicing handstand pushups?
Wrist pain usually means the mobility warmup was skipped or load progressed too fast. Rest, bring daily wrist circles back into your routine, and rebuild volume slowly before returning to inverted work.