Incase you didn’t know, a prowler sled is a great tool for a brutal conditioning workout, but the price is a major turn-off. Here’s the good news: a DIY weight sled will cost you less than $60, and the whole thing can be done in under two hours.
There is a whole different level of enjoyment and satisfaction that comes with every training session when you drag a sled that you made yourself. It is possible for you to size, weight, and the type of handle to fit your exact training needs.
This article explains two different methods that have been tested: a tough wooden sled that can be loaded heavily and a lightweight PVC version that is ideal for training on the grass. Both designs work brilliantly for sprint work, heavy drags, and conditioning circuits.
Understanding the Purpose of a Weight Sled
Sled work transforms your lower body training by targeting legs, hips, and core through functional movement patterns. The constant tension builds strength without the eccentric loading that causes excessive soreness.
The beauty of sled training lies in its versatility for all fitness levels. You can load heavy for pure strength, go light for speed development, or find the middle ground for conditioning work. The low-impact nature makes it ideal for active recovery days.
Push sleds require posts or handles you can grip and drive forward, while drag sleds attach to a rope or harness you pull behind you. Most DIY versions excel at dragging movements, which still deliver incredible results.
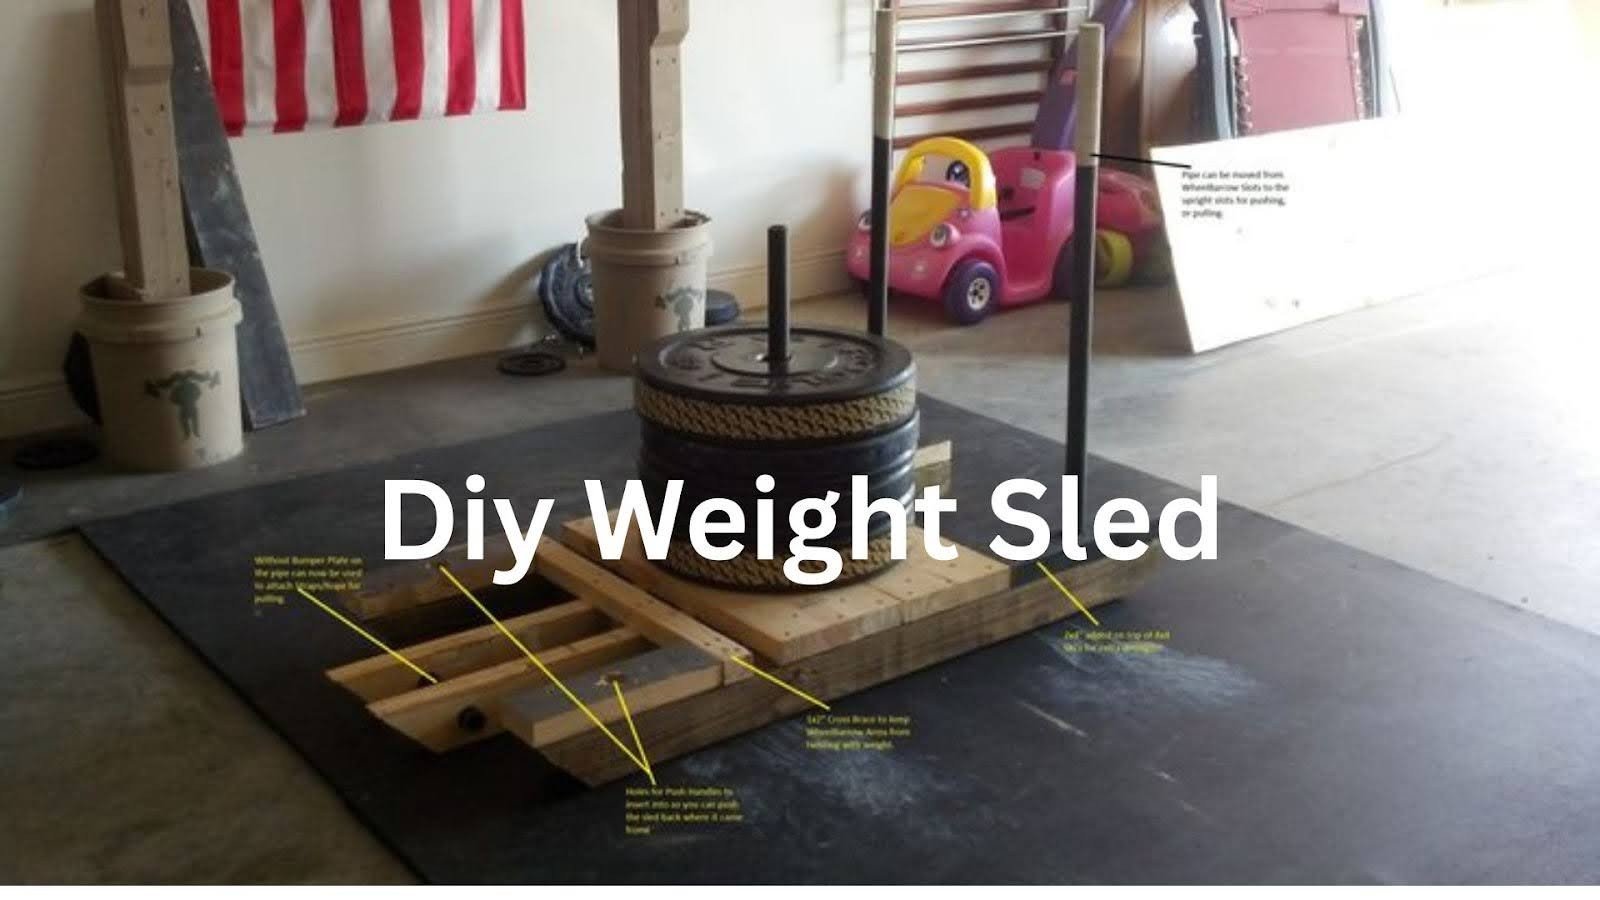
DIY Wooden Weight Sled (Alec Enkiri Method)
This solid wood design handles serious weight and stands up to aggressive training on concrete, asphalt, or turf.
Materials and Tools Needed

Building your DIY weight sled starts with a trip to the hardware store and about $50 in materials. You’ll need one 8-foot 2×12 board for the main base, two 2×6 boards cut into sections for the frame and skates, and a pipe flange with matching 18-inch plumbing pipe for the weight post.
The total cost runs around $50 to $,6,0 depending on lumber prices in your area. Budget about an hour for construction if you’re working at a steady pace. Most hardware stores will cut boards to length for free, saving you time and effort.
Gather everything before you start building so you’re not making multiple trips mid-project. Check that your pipe flange threading matches your weight plates. Standard Olympic plates fit a 2-inch diameter pipe perfectly, letting you load the sled just like a barbell.
Step-by-Step Build Instructions

Start by cutting your 2×6 boards into two 12-inch end pieces and four 6-inch sections for the skates. Position the 12-inch boards perpendicular to each end of your 2×12 base plank, creating a rectangular frame.
Flip the entire frame over and attach the four 6-inch skate pieces to the underside, spacing them evenly along the length. These runners let your DIY weight sled glide smoothly instead of digging into the ground.
Find the center point of your top surface and mount the pipe flange using the provided bolt holes. Thread your 18-inch pipe into the flange, tightening it completely so it stands vertical. Screw the eye bolts into the front end board, one on each side, about 3 inches from the edges.
Maintenance and Tips

Your wooden skateboards take the most abuse, so expect to replace them every few months, depending on training frequency and surface type. Concrete wears them down faster than turf or grass.
Balance your weight plates evenly on the post to prevent tipping during aggressive pulls. If the sled wants to roll sideways, you’ve loaded one side heavier than the other. Center the load and the problem disappears, giving you smooth, stable drags every time.
Use thick nylon or manila rope at least 3/4 inch in diameter for durability and grip comfort. A 15 to 20-foot length works well for most training spaces, giving you enough distance to build momentum.
Additional Performance Tips

- Drill a few extra eye bolt holes at different heights so you can switch up your pulling angles and target more muscle groups.
- Smooth every edge and corner with sandpaper you’ll thank yourself later when you’re setting up without splinters.
- If you plan to keep your sled outside, brush on a weatherproof sealant to protect the wood and make it last longer.
- Start lighter than you think you need to. It’s better to master form and get your body used to sled work before going heavy.
- Keep a wrench in your training bag you’ll need it occasionally to tighten the weight post since dragging can loosen the flange.
Usage Ideas

Heavy backward drags crush your quads like nothing else while keeping stress off your knees. Face away from the sled, lean forward slightly, and drive through your heels with each step. Load the sled heavily, keep distances shorter (20 to 40 yards).
Forward drags with the rope over your shoulder or attached to a belt work your posterior chain and build serious conditioning. Sprint variations with lighter weights develop explosive power and acceleration.
Mix your DIY weight sled into conditioning circuits by alternating drags with bodyweight exercises like pushups, burpees, or kettlebell swings. Try 30-second drag intervals followed by 30 seconds of another movement for 10 rounds.
Option 2: DIY PVC Weight Sled (eebalo Method)
This lightweight design assembles quickly and works perfectly for athletes training on grass, turf, or softer surfaces where wood might dig in.
Why Choose PVC Design

The PVC approach costs even less than wood while offering faster construction and easier customization for your space. All materials come from the plumbing section of any hardware store, and assembly takes maybe 30 minutes once you’ve cut everything to length.
Grass and turf present unique challenges for DIY weight sled training since you want smooth gliding without the frame catching or digging in. PVC’s smooth surface and light weight solve this perfectly.
Indoor training becomes viable with PVC since the material won’t scratch floors the way wood or metal can. The reduced weight lets you train in smaller spaces where turning and maneuvering matter.
Materials and Tools

Grab four 10-foot sections of 2-inch diameter PVC pipe for the main frame and runners, plus two 10-foot sections of 1-inch pipe for the weight post and cross bracing. You’ll need four 2-inch 90-degree elbows, four 2-inch tee connectors, one 2-inch to 1-inch reducer fitting, PVC cement, a hacksaw or PVC cutter, measuring tape, and rope or straps for pulling.
Most builds run $35 to $45 total, depending on pipe prices. Schedule 40 PVC provides plenty of strength for sled work without adding unnecessary weight. The 1-inch pipe threads through your weight plates while the 2-inch pipes create the stable base frame.
Consider adding padded pulling straps instead of bare rope for more comfortable training sessions. A simple weight belt attachment point lets you pull hands-free, opening up different exercise variations. Grab some sandpaper to smooth any rough cuts before assembly.
Step-by-Step Build Instructions

Measure and cut your 2-inch PVC into four 36-inch base runners and four 18-inch cross members. Cut the 1-inch pipe into one 24-inch vertical post and shorter bracing pieces as needed.
Check that everything fits square and the frame sits flat on the ground. The dry assembly lets you catch measurement errors before permanent bonding. Adjust any pieces that seem off, then mark each connection point so you remember the correct orientation.
Once satisfied with the fit, take the frame apart and apply PVC cement to each joint according to product instructions. Work quickly since the adhesive sets fast. Connect all base pieces first, creating the rectangular frame, then add the vertical post using the reducer fitting at the center.
Final Touches

Set your completed DIY weight sled aside for at least 2 hours while the PVC cement fully cures. Rushing this step risks joints coming apart under load. Most adhesives reach full strength after 24 hours, so overnight curing before first use gives maximum durability.
Check every joint monthly by trying to twist or pull connections apart. Any movement indicates a weak bond that needs reinforcement. Add extra cement or reinforce problem areas with PVC straps or metal clamps for added security.
Test the sled with light weight first to verify structural integrity before loading heavy plates. Walk through a few pulls, checking for flexing or stress points. The beauty of PVC construction is its easy repair.
Tips for Performance and Training Applications
Your new DIY weight sled opens up training possibilities that complement traditional lifting while building real-world strength and conditioning.
- Sprint drags with 25 to 50 percent bodyweight develop explosive acceleration and power production: Attach the sled to a belt or harness, lean forward at a 45-degree angle, and drive hard for 20 to 40 yards.
- Heavy backward drags using 100 to 200 percent bodyweight crush quads while minimizing knee stress: Face away from the sled, grab the rope handles at chest height, lean slightly forward, and take controlled steps backward. Keep tension on the rope throughout the movement.
- Moderate-weight forward drags at 50 to 75 percent bodyweight build work capacity when programmed for longer distances or time intervals: Pull for 60 to 90 seconds continuously, rest 60 seconds, and repeat for 8 to 12 rounds. Your heart rate stays elevated while your muscles learn to work under sustained tension.
- Mix sled variations into circuit training by combining 30 yards of dragging with 10 pushups, 15 kettlebell swings, and 20 mountain climbers: Complete 5 to 8 rounds with minimal rest between exercises. The combination builds both strength and metabolic conditioning simultaneously.
- Start every sled session with lighter weights than you think you need, focusing on movement quality and sustained speed: Form breaks down under excessive load, reducing training effectiveness and increasing injury risk. Maintain consistent velocity throughout each drag rather than slowing dramatically halfway through.
- Keep your core braced and shoulders pulled back during all dragging movements to protect your spine: Poor posture under load creates shearing forces on your lower back. Think about standing tall even when leaning forward for sprint work.
- Progress gradually by adding 5 to 10 pounds per session or increasing drag distance by 10 yards before jumping weight significantly: Your connective tissues need time to adapt to sled training’s unique demands. Patience in progression prevents overuse injuries and builds long-term capacity.
Conclusion
Essentially,you have two full plans to efficiently construct a DIY weight sled that is super cheap compared to the commercial option. The wooden sled is capable of handling maximum loading for heavy strength work, and the PVC sled is designed for portability and light surface contact.
Manufacturing your own gear means a deeper connection with your training than buying pre-made equipment can ever match. Every drag session is a reminder of the work you put into the construction.
Why not start collecting the materials this weekend and spend an afternoon building? After that, load up some plates, locate an open space, and feel the way sled work revolutionizes your conditioning.
Frequently Asked Questions
What surfaces work best for DIY weight sled training?
Concrete, asphalt, grass, and artificial turf all work well, depending on your sled design. Wood sleds with replaceable skates excel on hard surfaces, while PVC designs glide better on grass. Avoid gravel or rough terrain that catches the frame.
How much weight should beginners load on a homemade sled?
Start with 25 to 50 pounds and focus on maintaining speed throughout the drag distance. You should complete each rep without slowing dramatically halfway through. Add 5 to 10 pounds weekly as conditioning improves.
Can I use my DIY weight sled for pushing movements?
Drag sleds work best for pulling variations since they lack the vertical posts needed for pushing. Adding push handles requires additional construction and reinforcement to handle forward driving forces.
How long does a wooden weight sled last with regular use?
Expect 1 to 2 years of solid performance with proper maintenance. The skateboards need replacing every 2 to 4 months, d, depending on the surface and frequency. Treated lumber and weatherproof sealant extend life significantly.
What’s the best rope length for sled dragging workouts?
Use 15 to 20 feet of rope for most training applications. This length provides enough distance to build momentum while keeping the sled visible behind you. Shorter ropes (10 to 12 feet) work for heavy strength drags, where you take smaller steps.